Zing is built to query your own data, so you’ll want to set up a data source. While we provide a sample data set to help you get situated, adding your own data source (or sources) will make it possible to start asking questions of your company’s data from your phone or the web.
Adding a Data Source
The easiest way to set up a dataset is from the Zing web console,
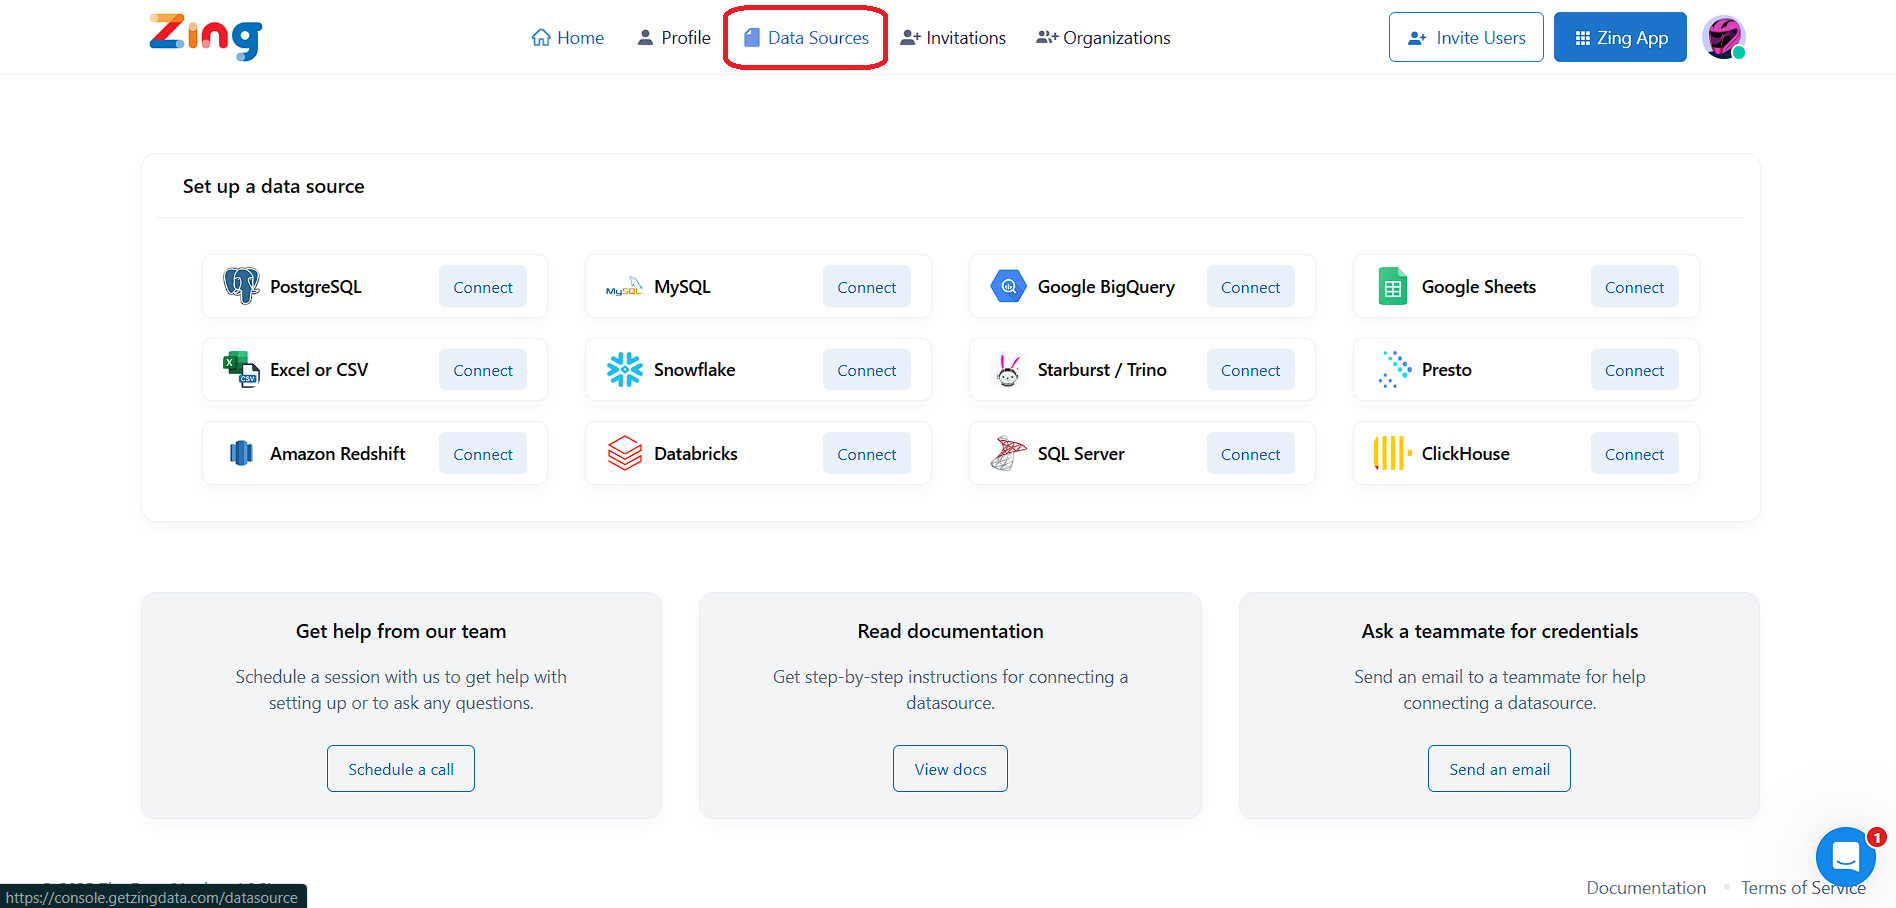
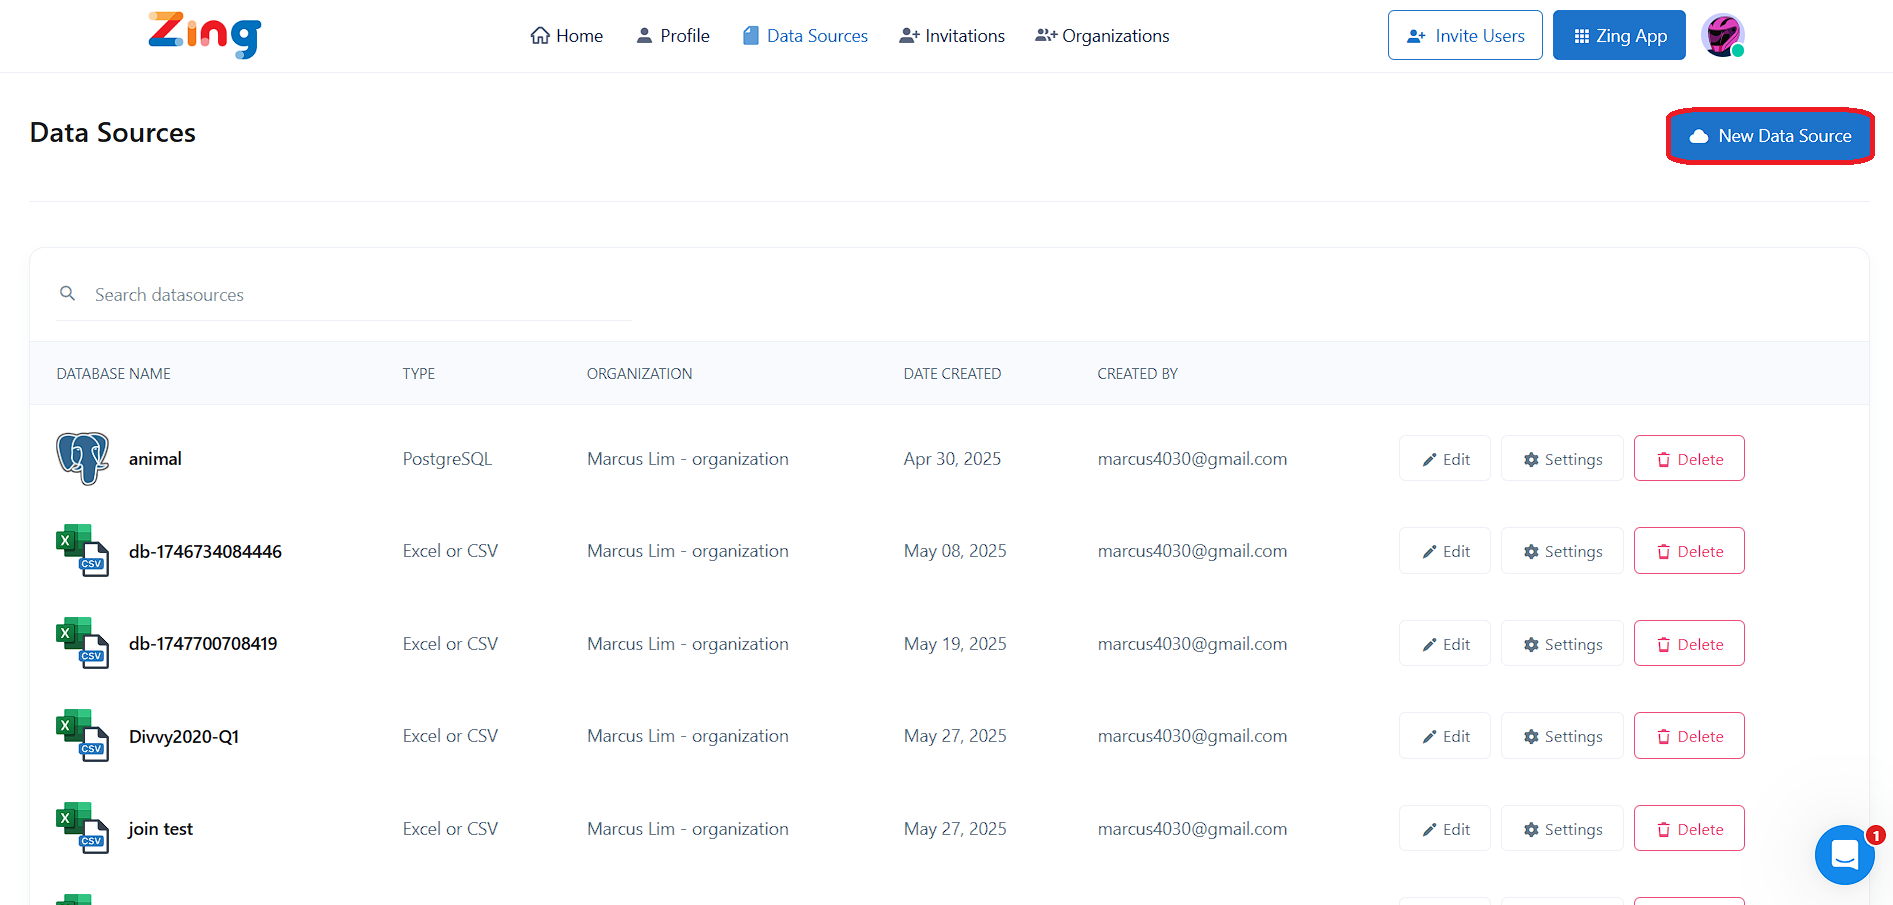
Once you are logged in, tap data sources then the new data source button.
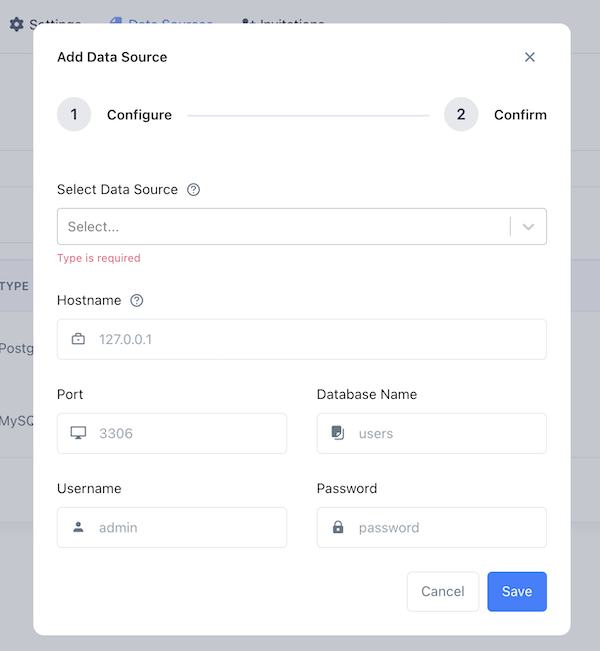
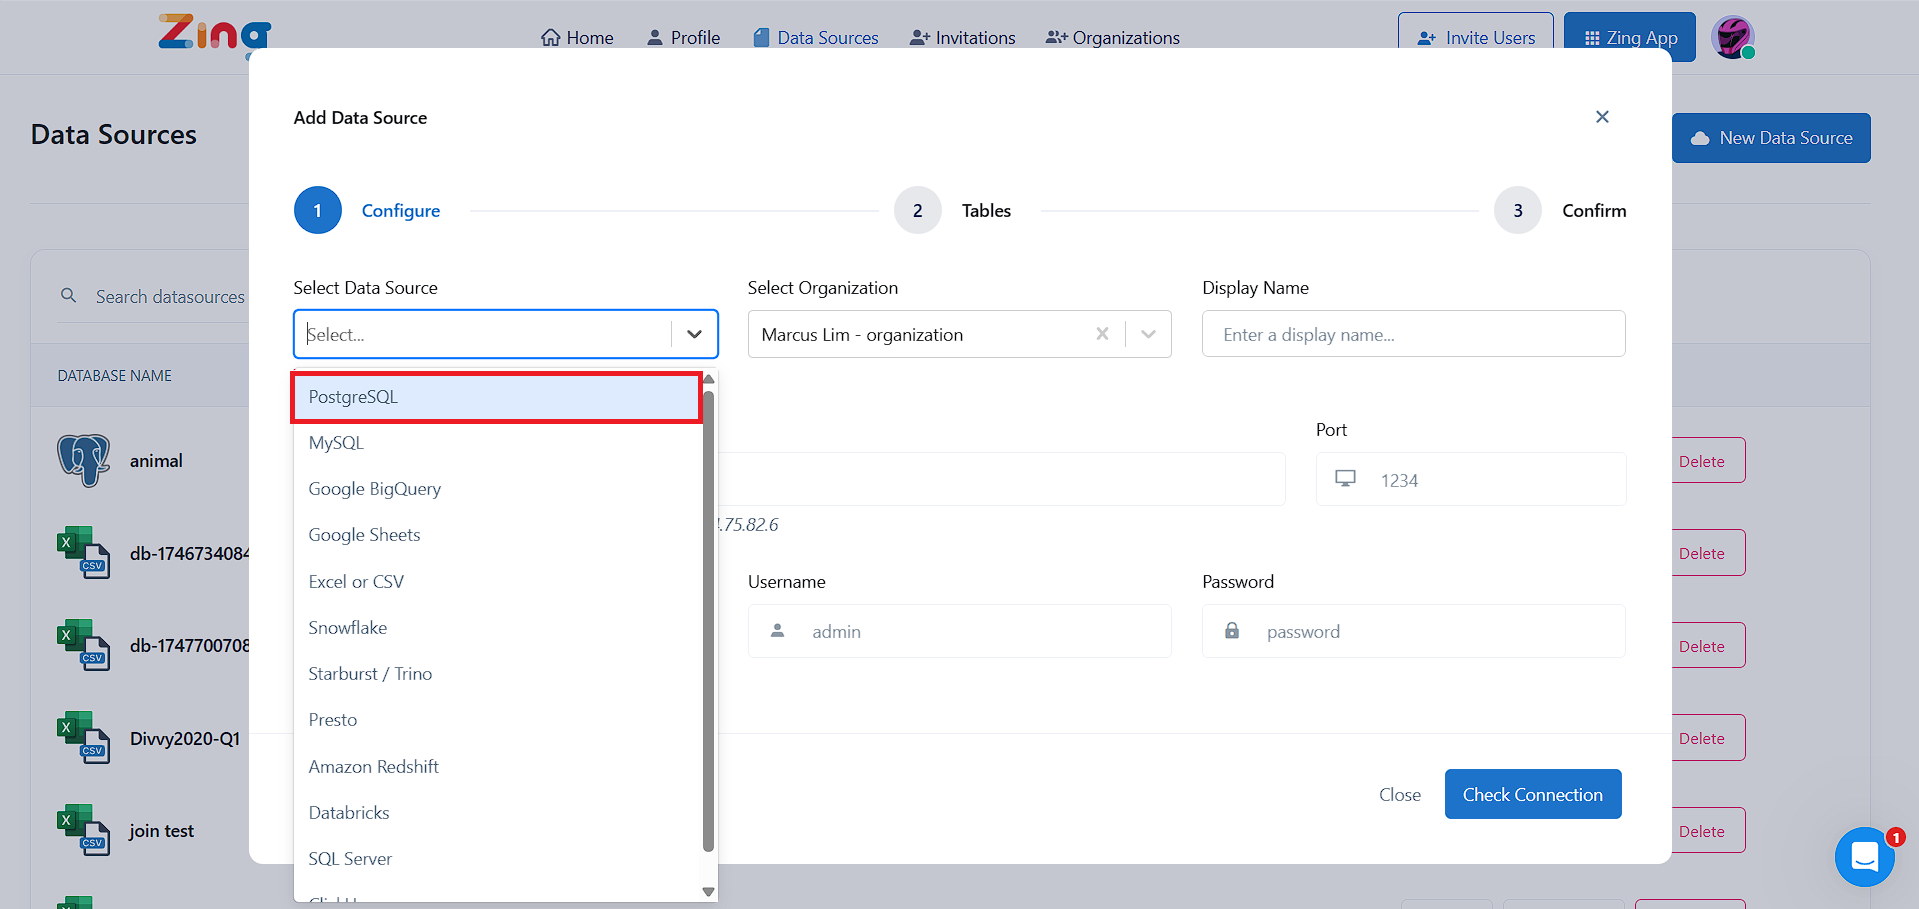
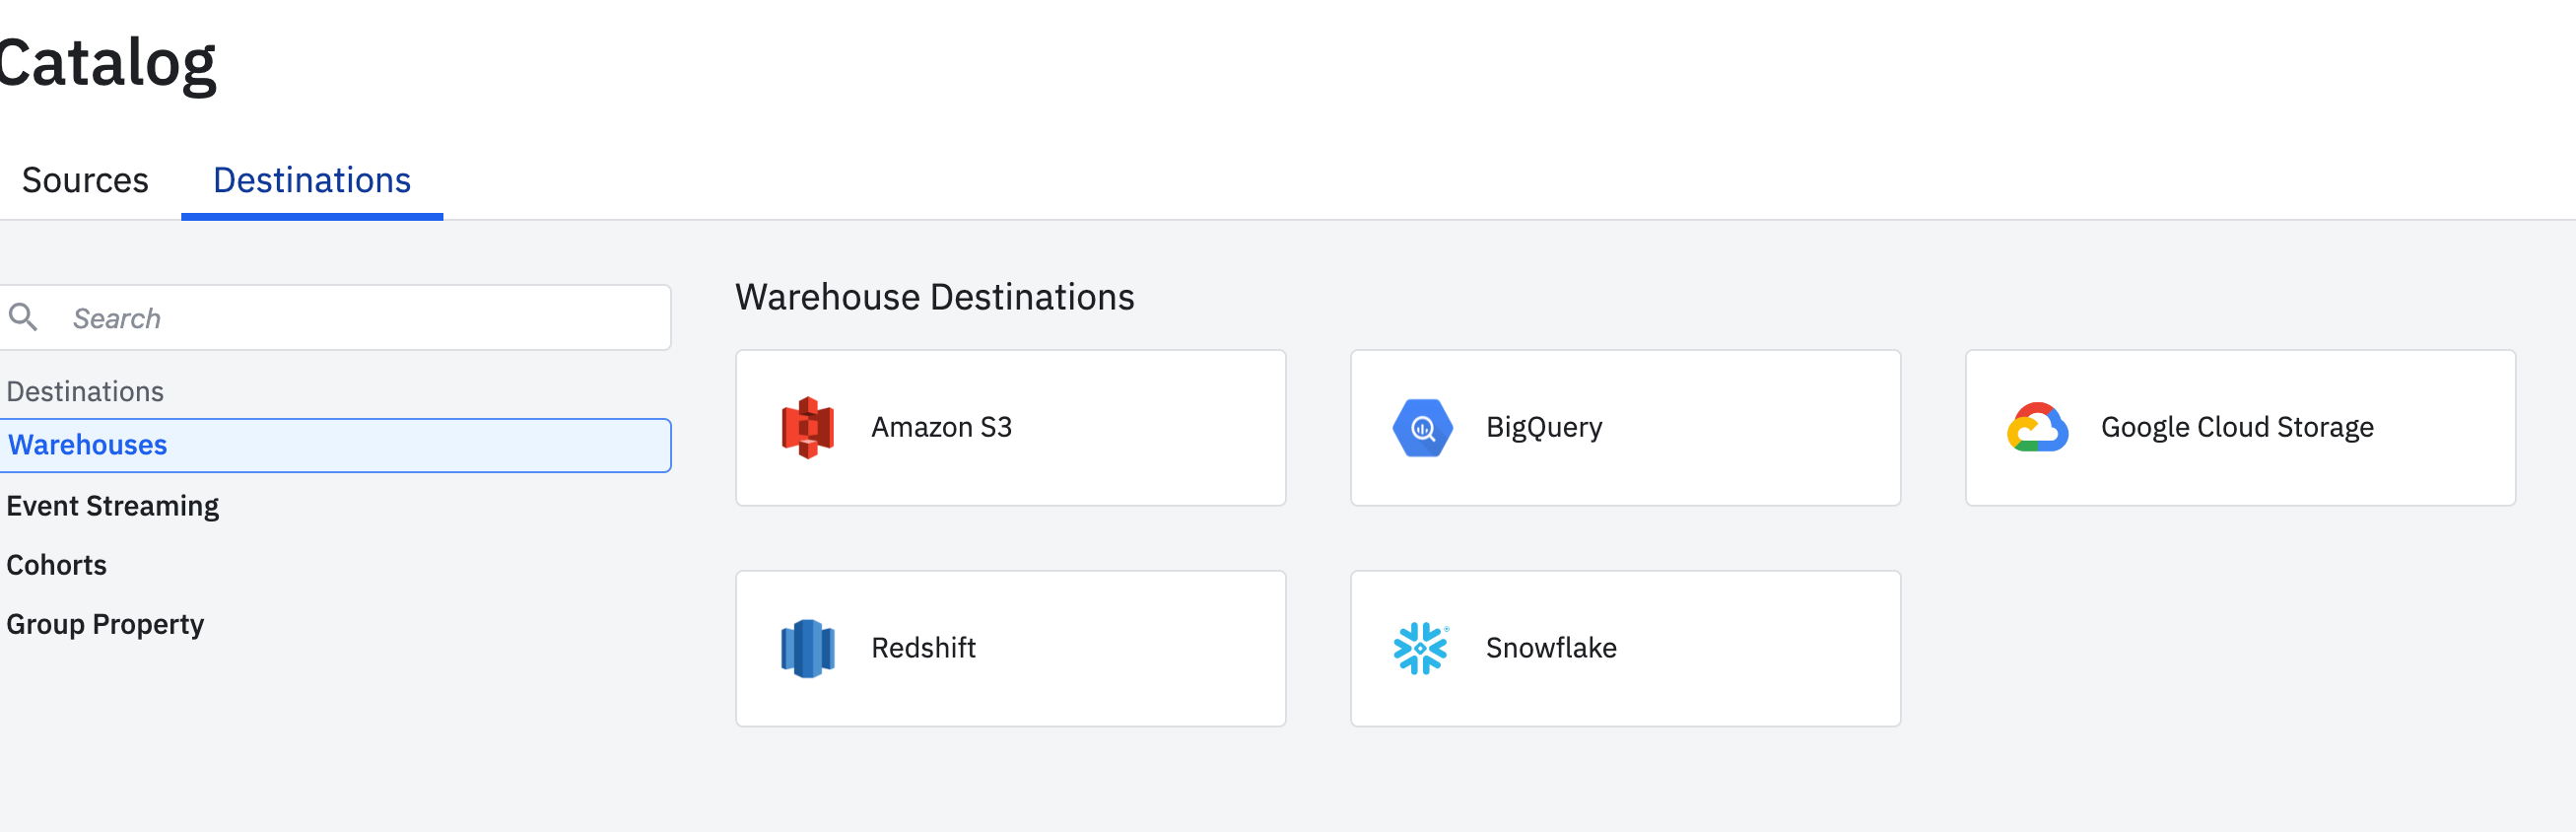
In the modal, select the data source type (such as Postgres, BigQuery, etc.)
Enter your database credentials, such as hostname, port, database name, username, and password
Press save
Zing will validate that your database credentials are valid once you press save and will add the source. It is then available immediately to query. If your credentials are invalid you’ll be prompted to check and resubmit.
You can also add database credentials directly from the Zing web, iOS, and Android apps by tapping the sources tab in the mobile app, then add new data source and following the steps above.
Once a data source as been added, it will immediately be available to all users that you have invited to your organization in the top of their Zing app in the tables section.
Note: You can set up multiple data sources with an organization, even across data source types. Zing will show the tables and views across data sources in the app.
Supported Data Sources
Database Type
Supported?
Notes
PostgreSQL
Yes
Zing also supports cloud-hosted versions of this such as Amazon RDS and Google Cloud SQL
mySQL
Yes
Snowflake
Yes
Google BigQuery
Yes
Setup only via web app (not mobile app)
Google Sheets
Yes
Trino / Presto / Starburst
Yes
Amazon Redshift
Yes
Microsoft SQL Server
Yes
Setup only via web app
Azure SQL
Yes
Setup only via web app
Databricks
Yes
Setup only via web app
Choosing what tables and views are visible
By default, all tables and views in your database are marked as ‘visible’ (including newly added tables), but you can exclude tables or views from visible and queryable in Zing if you’d like.
This is useful for excluding tables from other people in your organization which might be unnecessary for them (e.g. detailed server logs), or in simplifying the set of tables shown in Zing to be more streamlined.
To turn off tables or views:
First connect to your data source.
Then you’ll see a ’tables’ list and you can turn on/off all or individual tables/views.
Tap ‘Save’
Data Source Security
Two things you should to to ensure your database’s connection to Zing is secure:
Security best practices are to provide Zing read-only access (instead of full access) to your database. Zing doesn’t need write permissions and best security protocols dictate minimizing permissions. You see how to do this on StackOverflow for Postgres and mySQL.
When you make a data source accessible to the internet for Zing to be able to connect, it is best practice to limit the IP addresses that your database server will respond to.
This ensures that other IP addresses cannot access your database and only authorized IPs (such as Zing) are able to do so.
Zing’s IP address to whitelist is: 34.75.82.6
Additionally, if your database supports SSL, you should turn that on.
Data Source Aliasing
Database names often lack clarity and user-friendliness. Zing’s latest feature addresses this issue by allowing users to assign a simple display name, or alias, to their databases. This enhancement makes data exploration, querying, and chart creation more intuitive and efficient. With the ability to set short and descriptive data source names, users can easily navigate and interact with their data, ensuring a streamlined and user-centric experience. (1) Go to data sources (2) Enter your new display name (3) Go ask questions and see the new display name throughout the Zing platform
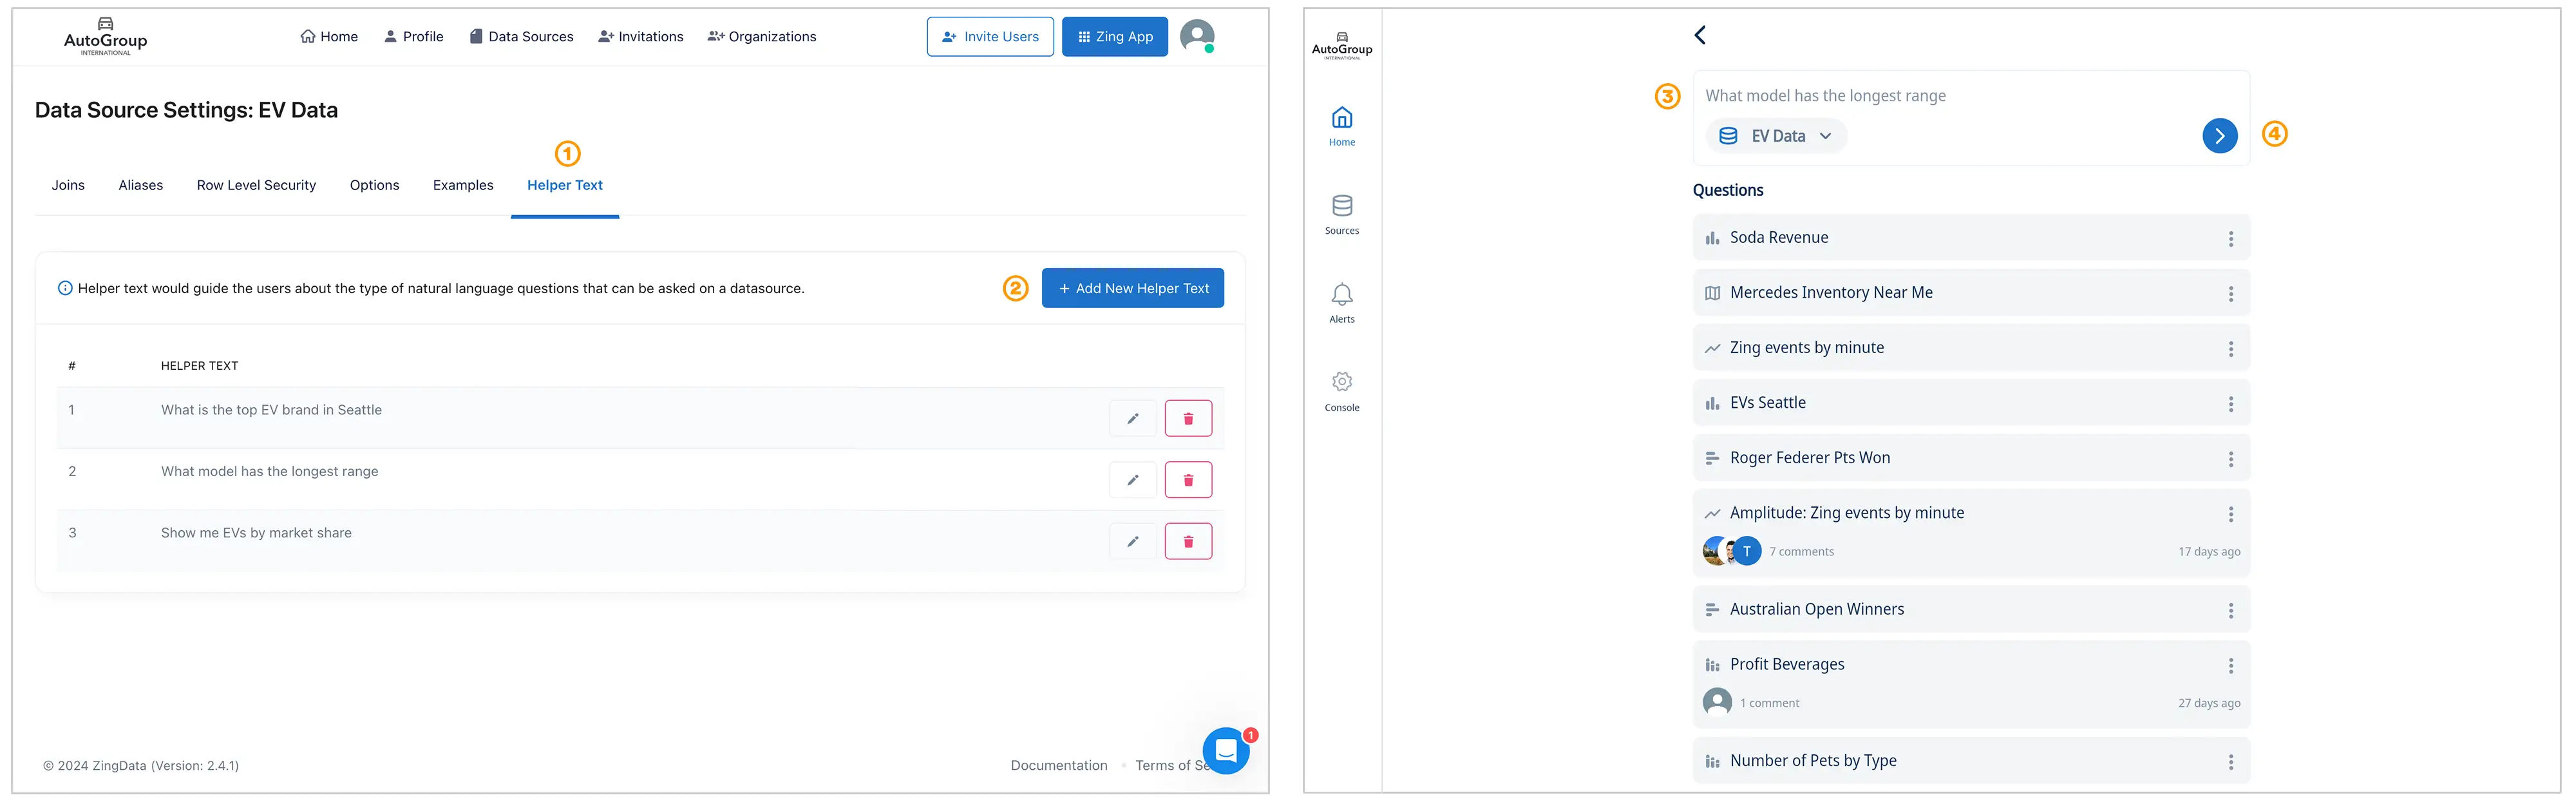
Adjust Helper Text in Search Box
To adjust the helper text in the Zing search box, go to the Zing Console, select a data source, and then click on [1] Helper Text. On the Helper Text page, you can create new helper text or edit existing entries [2]. If there is more than one helper text, Zing will automatically rotate the helper text in the search box [3]. The go button can be clicked at any time, and the helper text will be run as a query in the selected data source [4].
1 - PostgreSQL
Configure PostgreSQL with Zing
PostgreSQL is one of the most widely used databases in the world, and its free! Everybody from developers writing their first line of code, to data scientists, to major corporations use PostgresSQL to store and query data.
You can connect Zing to your Postgres database from either the Zing web console, the Zing web app, the iOS app, or Android.
You’ll need:
Hostname which is the URL or IP address of your database
Port which is the port that your database is live on – typically 5432 by default for Postgres, but your port may differ
Database Name which is the name on your hostname IP / URL you database is referenced by
Username which is…your username. Best practice is to create a read only user
Password which is…your password. Once you enter this, Zing will automatically encrypt this.
Enter your PostgreSQL credentials, as outlined above. If your database requires SSL to be enabled, turn on ‘Require SSL’ (not all Postgres configurations require this).
If your Postgres database is behind a firewall, you’ll need to configure your firewall to allow connections from Zing’s IP address: 34.75.82.6
Tap ‘Save’
The data source you just added will be available to everybody in your organization.
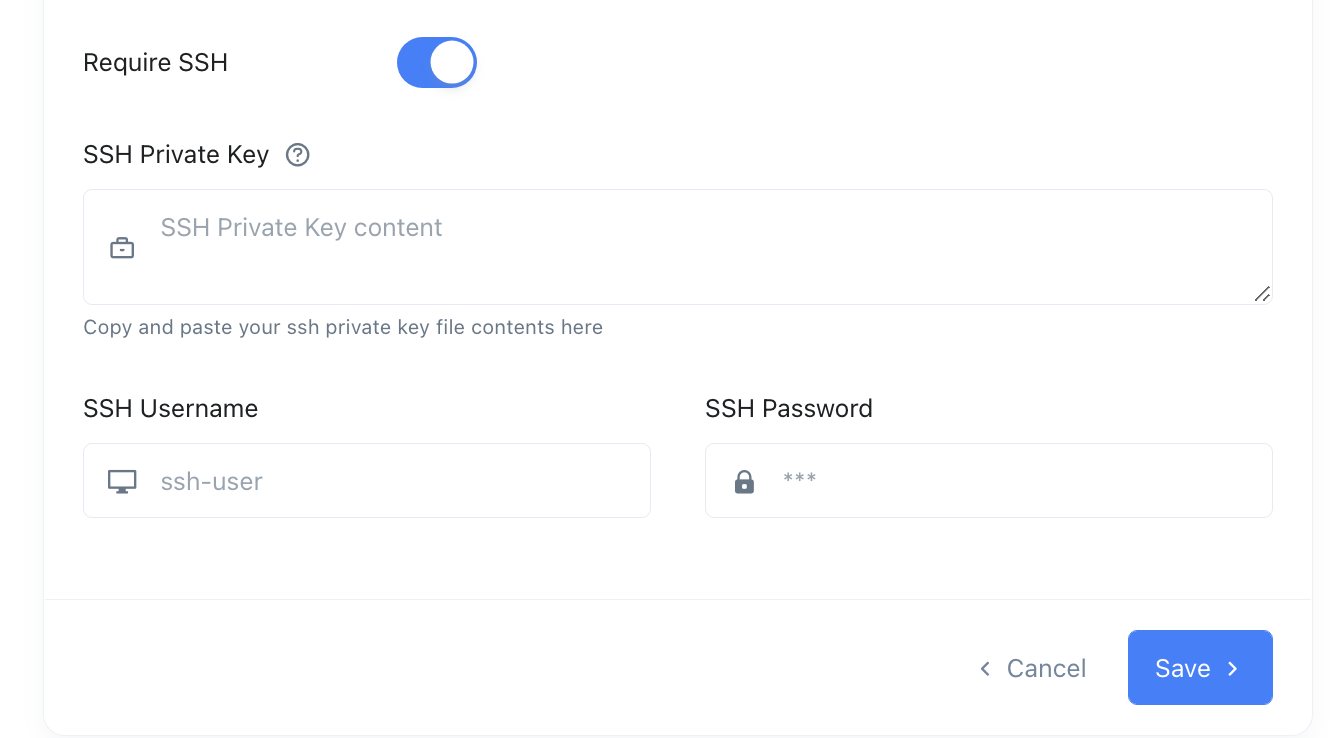
SSH Tunneling
Zing Data supports connecting to your postgres database via an SSH tunnel (sometimes referred to as SSH port forwarding). In an SSH tunnel, the entire network connection between your postgres database and the Zing Data platform is encrypted. This provides adequate security, even for databases that do not have SSL. In some cases, and for some databases, an SSH tunnel can provide better performance than connecting over SSL.
When seting up an SSH tunnel, you will need the following
SSH username
This is the username of the ssh tunnel.
SSH private key
Enter the SSH private key in RSA pem format in the text area. Make sure to not modify any of the newlines.
SSH password
This is usually not required, as an SSH tunnel can be set up without one.
SSH port
If no port is specified, Zing Data will attempt to initiate the tunnel connection over port 22.
App
To add a PostgreSQL database from your phone or the Zing Web App:
Go to the sources tab
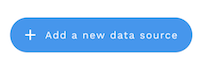
Tap ‘Add a new data source’
Enter your database credentials
Tap ‘Confirm data source’
Zing will verify that it can connect to your data source and if successful, add it as a source. If Zing cannot connect to your data source, you'll see a message asking your to check your credentials and retry. If even after checking your credentials and retrying you still experience issues, reach out to Zing support here
2 - MySQL
Configure MySQL with Zing
MySQL is one of the most widely used databases in the world, and its free! Everybody from developers writing their first line of code, to data scientists, to major corporations use MySQL to store and query data.
You can connect Zing to your MySQL database from either the Zing web console, the Zing web app, the iOS app, or Android.
You’ll need:
Hostname which is the URL or IP address of your database
Port which is the port that your database is live on – typically 3306 by default for mySQL, but your port may differ
Database Name which is the name on your hostname IP / URL you database is referenced by
Username which is…your username. Best practice is to create a read only user
Password which is…your password. Once you enter this, Zing will automatically encrypt this.
Enter your mySQL credentials, as outlined above. If your database requires SSL to be enabled, turn on ‘Require SSL’ (not all MySQL configurations require this).
If your mySQL database is behind a firewall, you’ll need to allow connections from Zing’s IP address: 34.75.82.6
Tap ‘Save’
The data source you just added will be available to everybody in your organization.
App
To add a MySQL database from your phone or the Zing web app:
Go to the sources tab
Tap ‘Add a new data source’
Enter your database credentials
Tap ‘Confirm data source’
Zing will verify that it can connect to your data source and if successful, add it as a source. If Zing cannot connect to your data source, you'll see a message asking your to check your credentials and retry. If even after checking your credentials and retrying you still experience issues, reach out to Zing support here
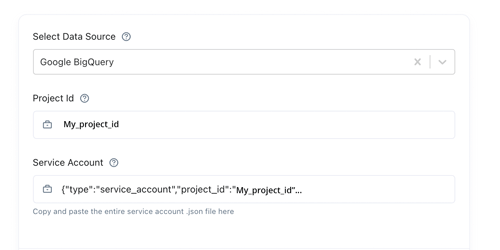
Project ID which is the ID for your project in BigQuery
Service Account JSON which is the file from your Google BigQuery account and allows Zing to authenticate into your BigQuery data source
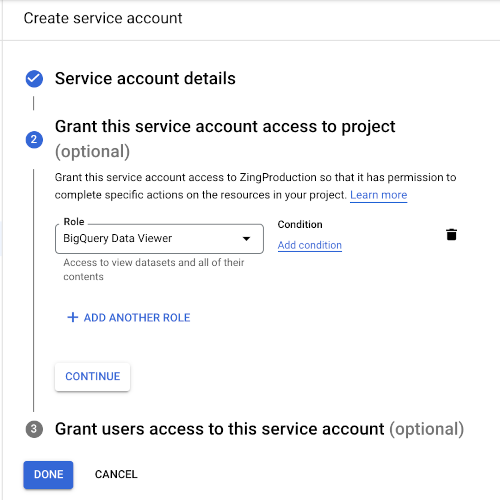
You’ll also need to set up appropriate permissions, namely: Big Query Viewer rights and BigQuery Job User rights
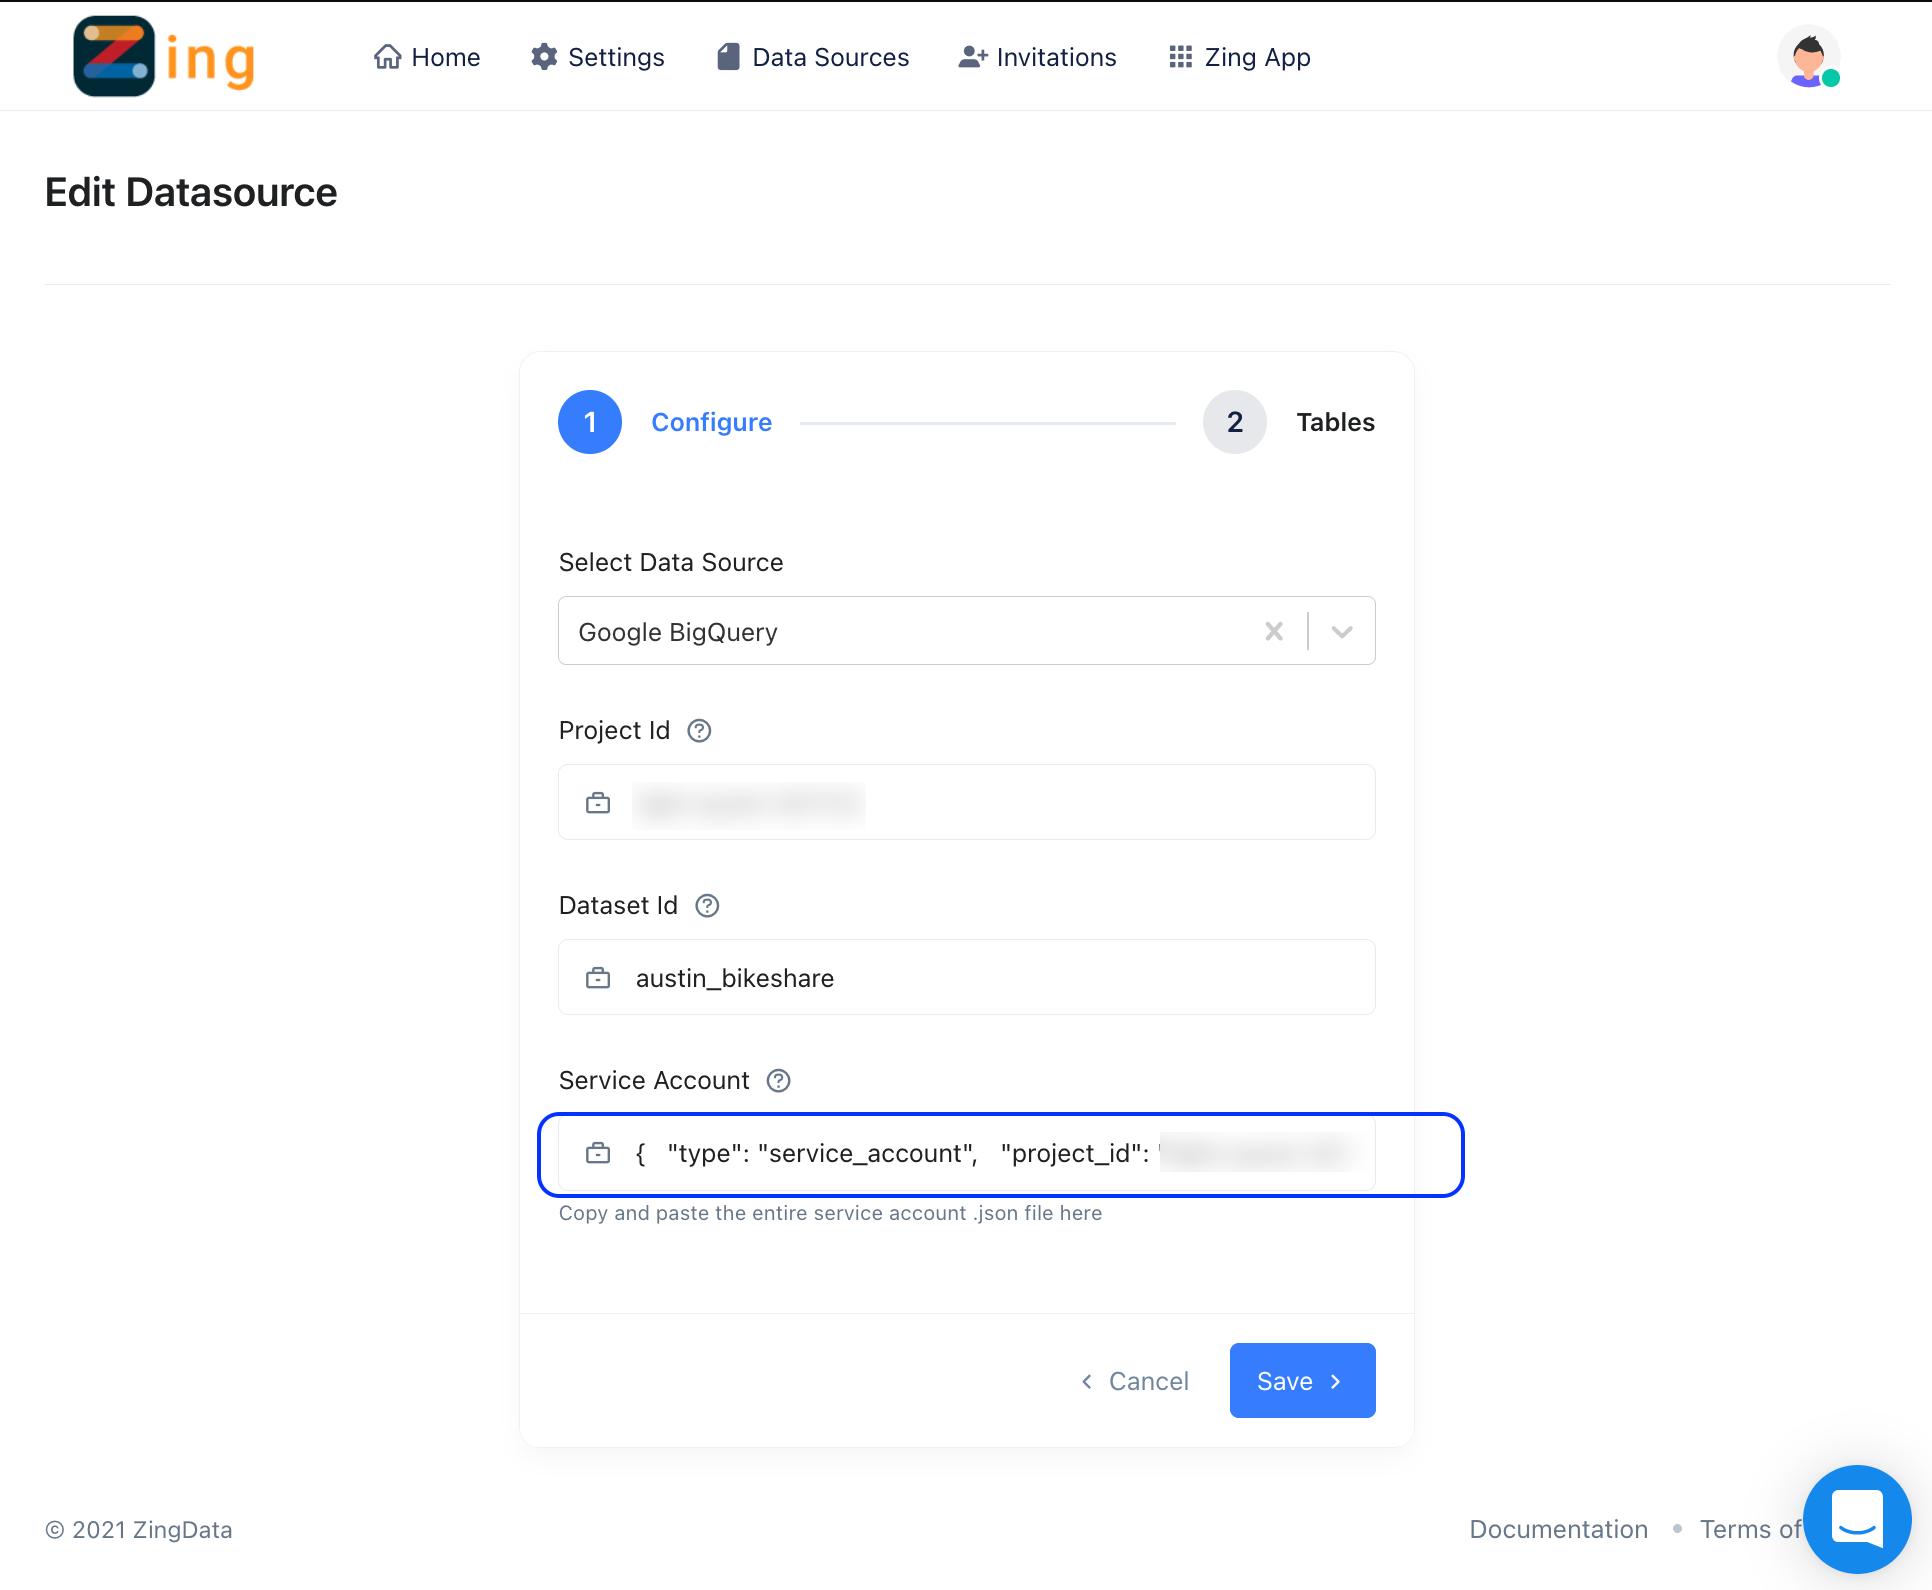
Project ID
Just copy and paste your Project ID from your Google BigQuery account. You’ll get this from your Google Cloud Console.
Service Account
Your service account is set up by copying your credentials from your Google service account.
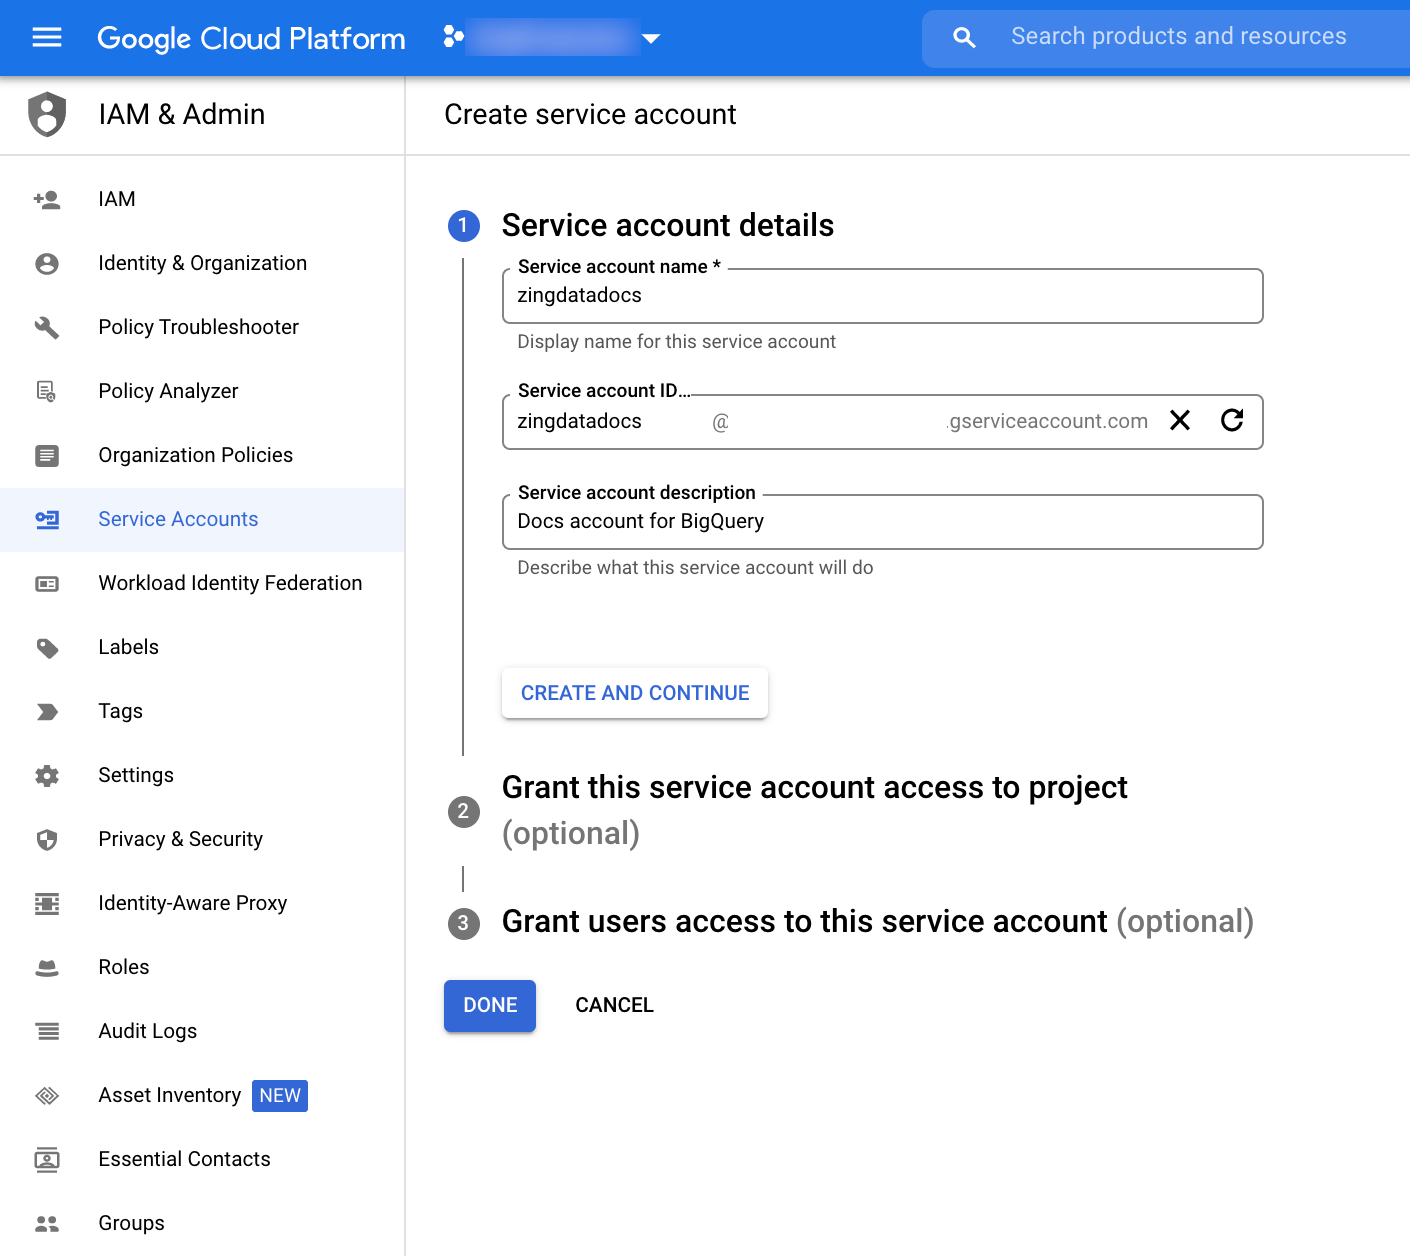
To access your BigQuery credentials required to connect Zing:
Log in to your Google Cloud Console
Click ‘IAM & Console’
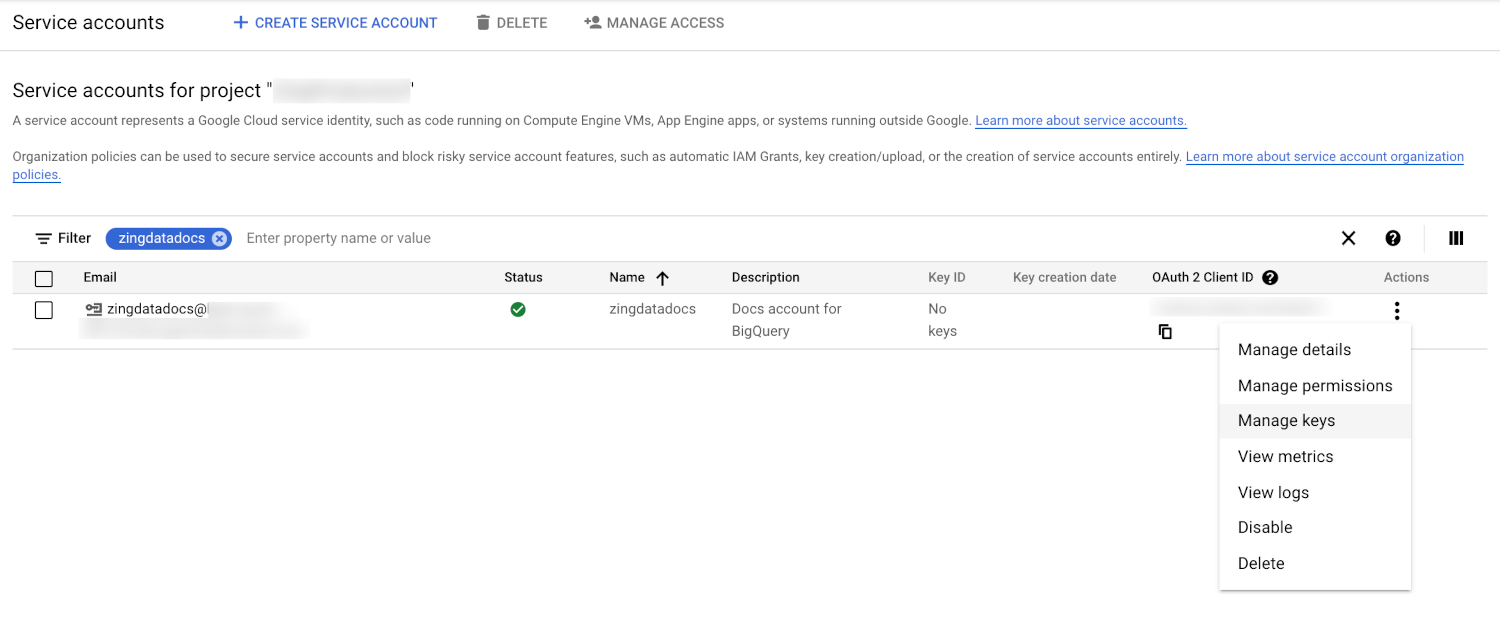
Click ‘Service Accounts’
Add Big Query Viewer rights and BigQuery Job User rights
Select Manage Keys
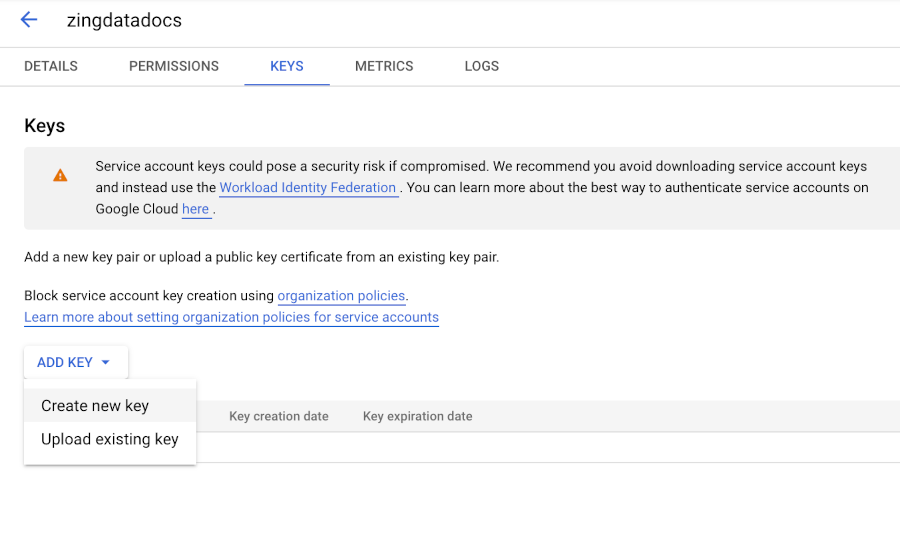
Select Create Key
Select JSON
From here, download the JSON file containing your Service Account information. Copy and paste the file’s contents into the Zing Data setup screen in the ‘Service Account’ box.
Note:
Setting up Google BigQuery with Zing must be done using the Zing Web Console.
4 - Google Cloud SQL
Configure Google Cloud SQL with Zing
Google Cloud SQL is a fully managed relational database service for MySQL, PostgreSQL, and SQL Server with rich extension collections, configuration flags, and developer ecosystems. It automatically ensures your databases are reliable, secure, and scalable so that your business continues to run without disruption. Cloud SQL automates all your backups, replication, encryption patches, and capacity increases.
You can connect Zing to your MySQL database from either the Zing web console, the Zing web app, the iOS app, or Android.
Gathering the required information
Hostname
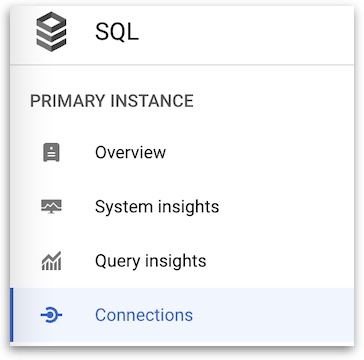
From the Navigation Menu on your Google SQL Cloud Console, click on “Connections”:
Find the Hostname from the Public IP address under “Networking section”
Port
The default port for your database engine type:
MySQL: 3306
PostgreSQL: 5432
Microsoft SQL Server: N.A
Database Name
From the Navigation Menu on your Google SQL Cloud Console, click on “Databases”:
The table lists all the databases hosted on your Cloud SQL instance, identify the name of the database you wish to connect to.
Username
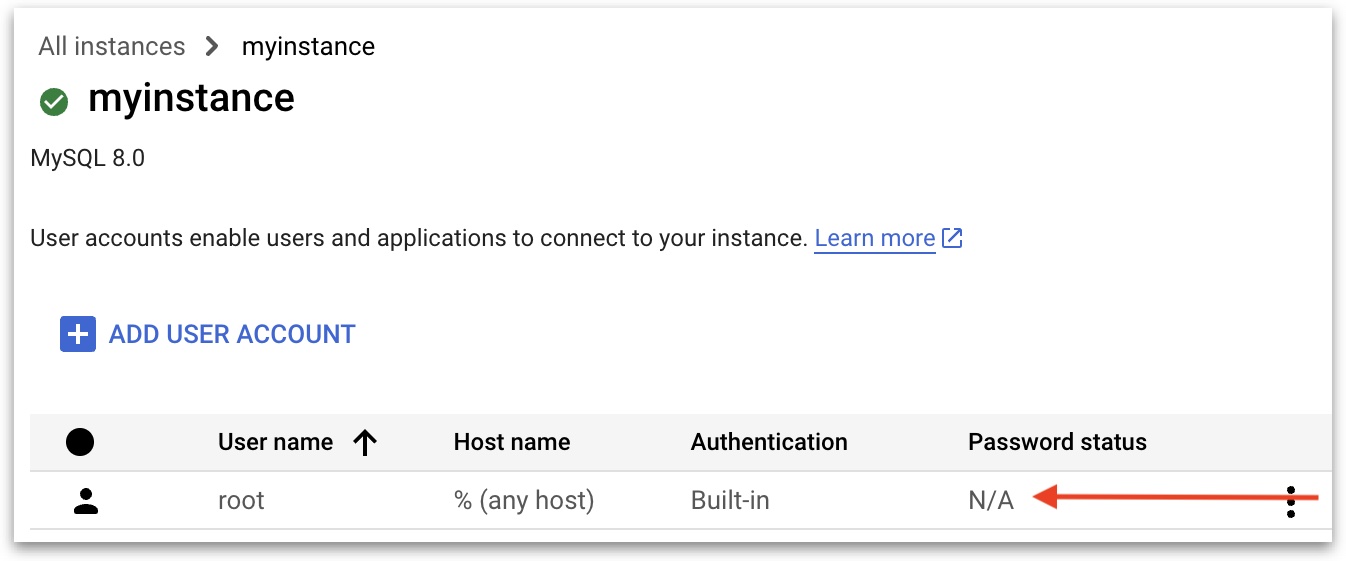
From the Navigation Menu on your Google SQL Cloud Console, click on “Users”:
Identify the name of your user under “User name”
Password
Retrieve the password corresponding to the user identified. Once you enter this, Zing will automatically encrypt this.
Whitelisting Zing Data’s IP on your Cloud SQL Instance
For Zing Data to connect to your Cloud SQL instance, you must authorize Zing’s network on the Cloud SQL console.
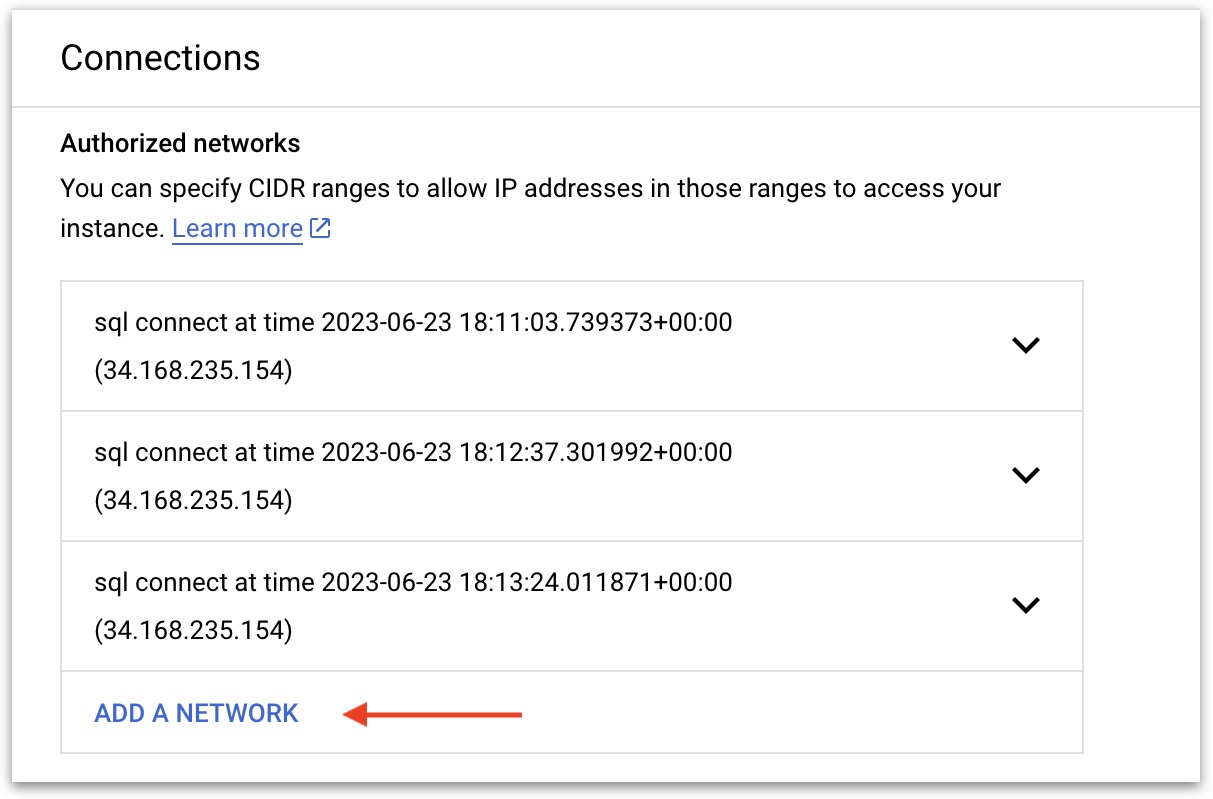
From the Navigation Menu on your Google SQL Cloud Console, click on “Connections” and then the “Networking” tab on the page,
Under the “Authorized networks” section, click on “ADD A NETWORK” to whitelist a network for the Cloud SQL instance.
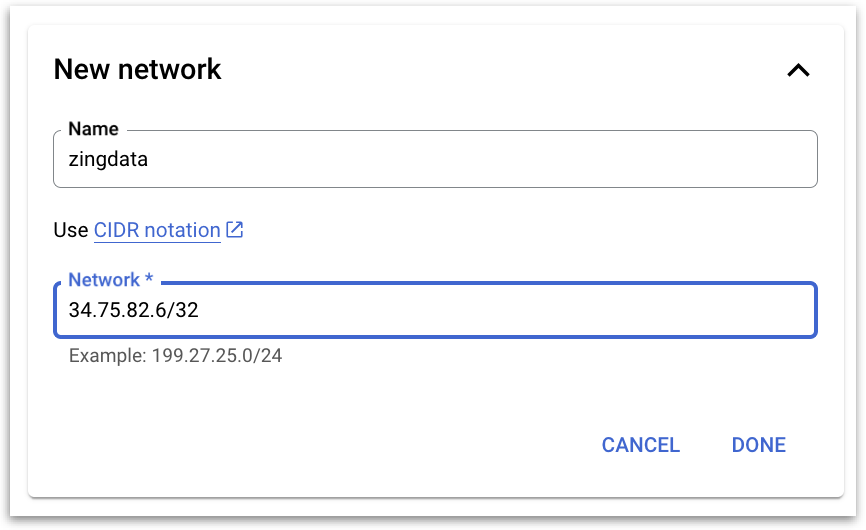
Give a name for this network, i.e. “zingdata” and paste Zing’s IP address: 34.75.82.6/32 under “Network*”.
Scroll down and hit “Save” to update your changes.
Adding the data source on Zing Data
You are now ready to add in your data source on Zing!
Follow these guides on adding a new data source on Zing, based on your database engine:
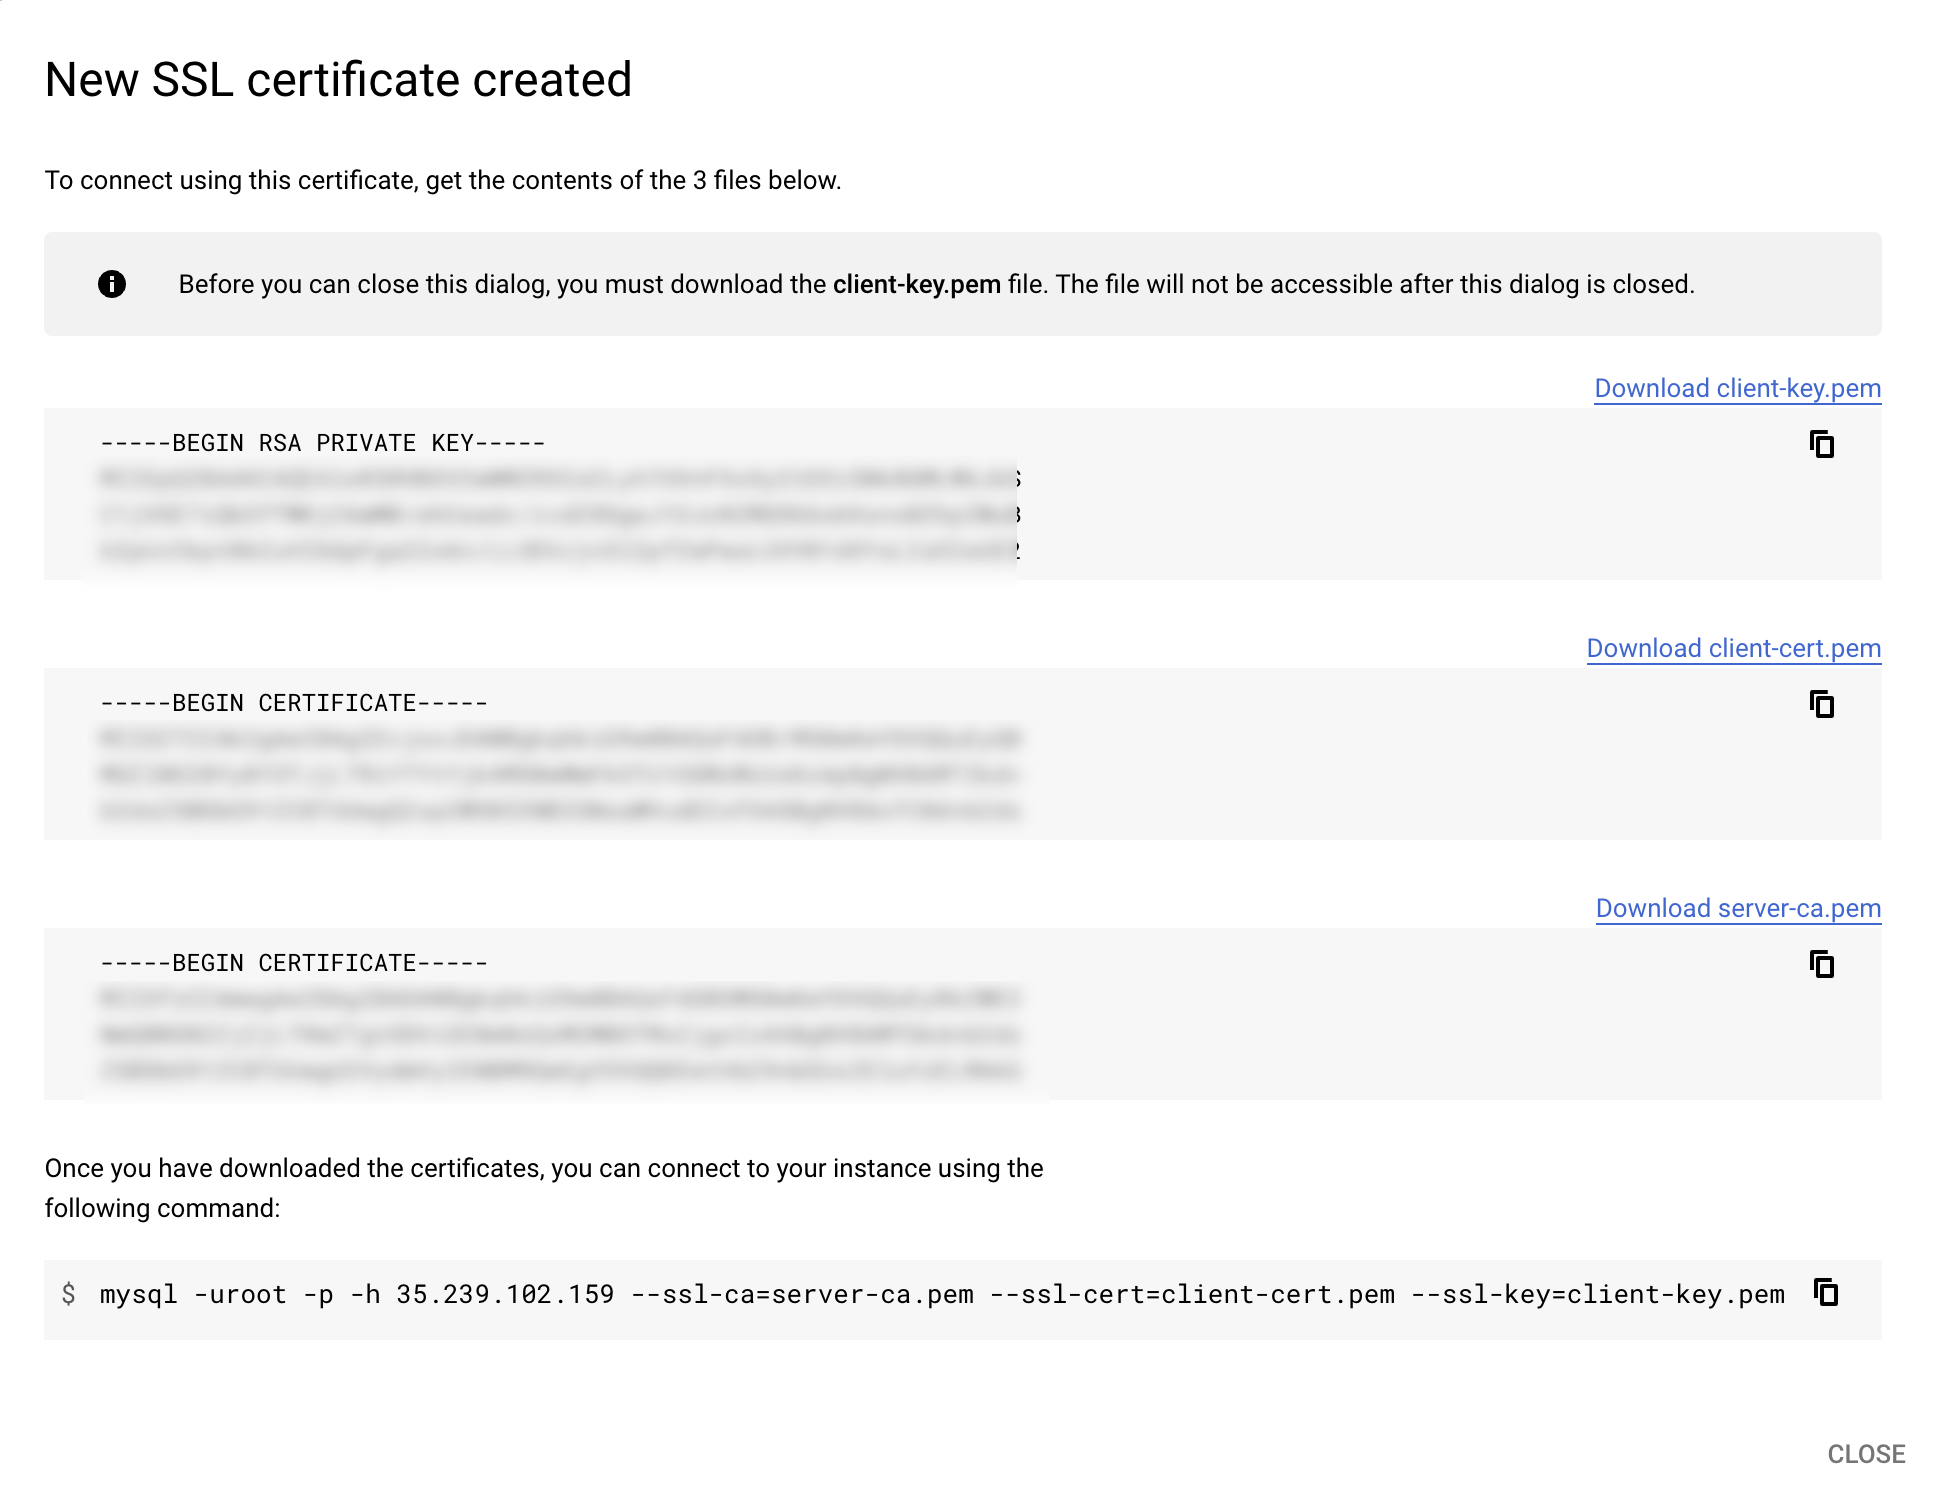
To connect Zing Data to your Cloud SQL instance via the SSL protocol, you need to download the following authentication documents from Google Cloud:
Server Root Certificate
Client Certificate
Client Private Key
Only the server root certificate is required for Microsoft SQL Server.
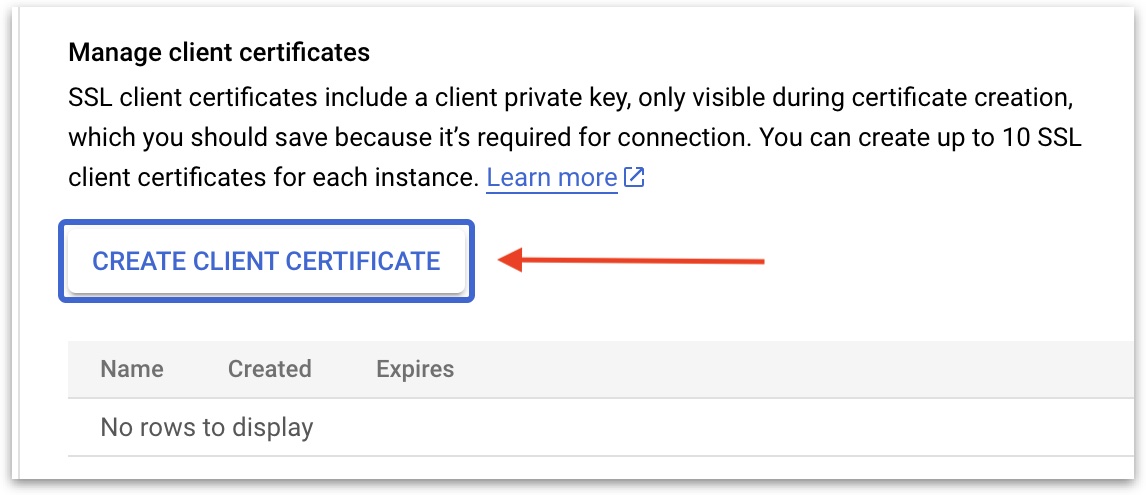
You can do so by clicking on “Connections”, then the “Security” tab on the page, and then “CREATE CLIENT CERTIFICATE”:
Create a name for the SSL client and download all of the files or copy the texts on to somewhere secure:
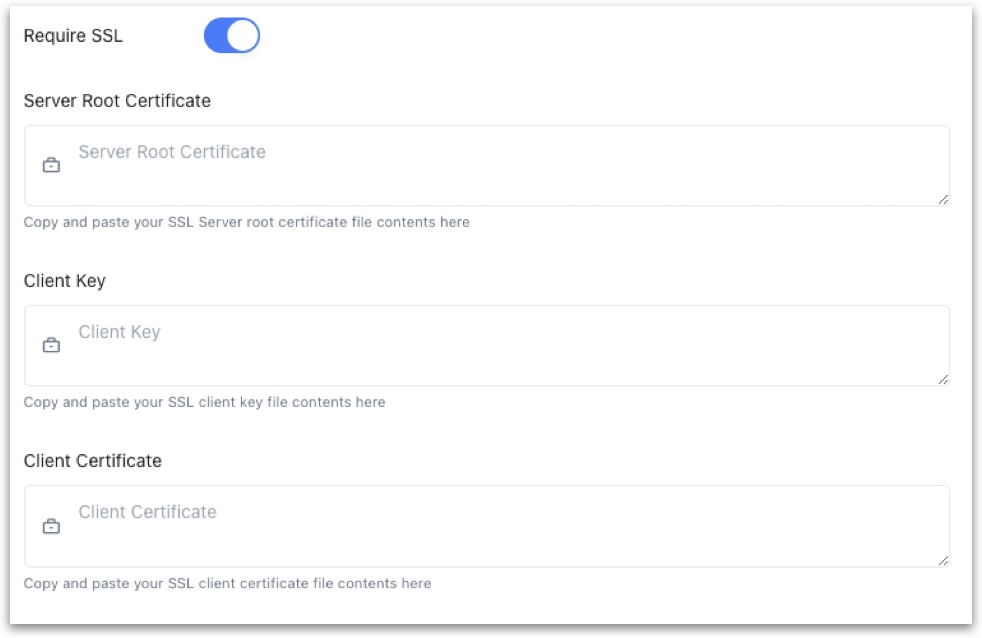
Using your certificates and keys:
On Zing’s adding a data source page, click on “Require SSL” and paste the corresponding text into each text box, removing any trailing whitespace:
Zing will verify that it can connect to your data source and if successful, add it as a source. If Zing cannot connect to your data source, you'll see a message asking your to check your credentials and retry. If even after checking your credentials and retrying you still experience issues, reach out to Zing support here
5 - Google Sheets
Configure Google Sheets with Zing
Google Sheets is a widely used cloud spreadsheet. Setting up Zing with Google Sheets is the easiest way to get started, as it requires no database connection. You can simply authenticate in with your Google credentials, or provide the URL to your Sheets.
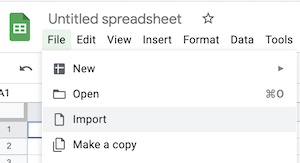
This is also the best way to import CSVs (assuming they are within Sheets’ size limitations).
You can also connect to a Microsoft Excel file by importing it into Google Sheets, then connecting that sheet to Zing.
You can connect Zing to Google Sheets from either the Zing web console, the Zing web app, the iOS app, or Android.
Connection Modes
There are two ways to connect to Google Sheets:
Live Connection mode, which will always run questions on the latest version of a sheet, and works with multiple tabs (you can choose which to make visible in Zing).
Snapshot mode, which will run questions on the version of the sheet when you first connected it to Zing, and subsequent updates to the sheet will not be updated in Zing. This mode supports a single tab.
Setup Steps
For both modes, you’ll need:
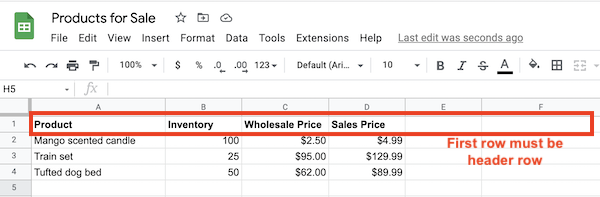
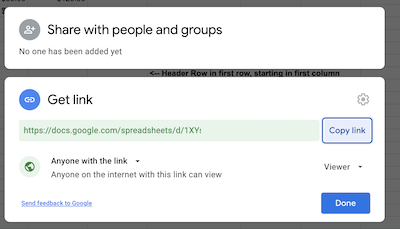
A correctly formatted Google Sheet with field names in the header row. Your sheet should contain only the data you wish to import. Only one table per sheet (for now). Field names should not include special characters.
Permissions to that sheet - meaning that your Google Account has at least ‘view’ rights to the sheet, OR the sheet has ‘available to anybody with the link’ access
To connect Zing to Google Sheets that are not public, authenticate into your Google account by clicking ‘Access your Google Sheets’ and enabling both Zing read access to your Sheets, and Google Drive read permissions when prompted. Both of these permissions must be granted for Zing to list your sheets and connect to your sheets as a data source.
From there you’ll see a list of your Google Sheets. Select one you’d like to import or search by name and click the name of the sheet, then click ‘Select’
To connect Zing to a publicly shared (available to anybody with the link) Google Sheet, you don’t need to authenticate into a Google account and can simply enter your Google Sheet URL.
Tap ‘Save’
Check for any warning messages which might indicate the sheet was incorrectly formatted.
Optionally choose if you want a live connection or a one-time snapshot. If you selected ’live connection’, choose which tabs you want to make visible to Zing.
The data source you just added will be available to everybody in your organization.
App
To add a Google Sheet as a data source from the Zing iOS or Android apps:
Go to the sources tab
Tap ‘Add a new data source’
To connect Zing to Google Sheets that are not public, authenticate into your Google account by clicking ‘Access your Google Sheets’ and enabling Zing read access to your Sheets when prompted. From there you’ll see a list of your Google Sheets. Select one you’d like to import or search by name and click the name of the sheet, then click ‘Select’
To connect Zing to a publicly shared (available to anybody with the link) Google Sheet, you don’t need to authenticate into a Google account and can simply enter your Google Sheet URL.
Optionally choose if you want a live connection or a one-time snapshot. If you selected ’live connection’, choose which tabs you want to make visible to Zing.
Tap ‘Confirm data source’. After a few seconds, Zing will show you if the sheet was successfully connected.
Notes
If you use the ‘Live Connection’ option to link Zing and the Google Sheet, be aware that modifying the sheet in a way that makes it improperly formatted (see above) will result in questions / graphs not loading correctly.
6 - Excel, CSVs and JSONs
Import Microsft Excel, Comma Seperated Value and JSON files to Zing
Excel (XLS, XLSX) and CSV files can be read into Zing Data directly OR can be imported into a Google Sheet:
Direct Import is fast, good for small files, and useful if you don’t have a Google account or can’t use Google Sheets at your organization.
Google Sheets connection allows for dynamic alerts and updates to the data which will be immediately reflected in Zing.
Direct Import
Directly import CSVs and Excel files in Zing’s mobile apps (iOS, Android) and the web.
File types supported are:
csv
dbf
geojson
json
ndjson
xls
xlsx
Files up to 10 megabytes can be uploaded on the basic (free) plan, and larger upload sizes are available on the Standard, Pro and Enterprise plans.
To import a file, select the Excel or CSV option under ‘Add Datasource’ tab on mobile + web, or from the data sources tab on the Zing web console.
Formatting the file
In order to successfully import a file, the correct formatting should be applied to the data in the file before uploading.
Excel Files:
The first row must contain field names
Field names should not include special characters such as ()./\[\]\{\}?!@#$%^&\*()\_+-=.
There should not be any extra empty columns as these can result in the import to not work correctly.
JSON Files:
The file should contain a list of objects.
The property name should be enclosed in double quotes.
If the value is a string or a date, that should be enclosed in double quotes too.
An example of a correctly formatted JSON file would be as follows:
We’ve added the ability to use Zing with an unlimited number of CSV files, join across them, and add/replace/delete them in much more flexible ways:
Append: Add new data to an existing table
Add new rows to an existing table
If the new CSV has columns that aren’t present in the existing table, those new columns will be added
This is the equivalent of UNION ALL in SQL
Overwrite: Keep the same table name, but replace the data
All existing questions and dashboards connected to that table will work how you expect, but use the newly-uploaded data.
The previous data in the table is deleted
Multi-file upload: Add multiple CSV or Excel files at once
Upload up to 10 MB per file (free plan) or 100 MB per file (paid plans)
Optionally define join relationships between them to create a full queryable, multi-table data environment without needing to stand up a database
CSV and Excel files can co-exist and all live within a single data source
Previously, each CSV or Excel file imported was its own ‘data source’
Now, you can choose if you want to add a new file to an EXISTING data source, or instead create a NEW data source. Adding a file to an existing data source can make joining tables and appending / updating data easier.
Google Sheets Connection
Excel and comma separated value files are common ways to store data. You can import these files to Zing via the Google Sheet importer.
All of these file types are supported:
.xls (if newer than Microsoft® Office 95)
.xlsx
.xlsm
.xlt
.xltx
.xltm
.ods
.csv
.txt
.tsv
.tab
Import Steps
First, import your (non-password-protected) file to Google Sheets:
Ensure the first row contains headers.
Every column to be imported must contain a header
Header names must be unique within your sheet
Exclude images, macros, tick-boxes, etc from your sheets prior to import
Tap ‘share’ and set link visiblity set to ‘anyone with the link’. Once the sheet is imported you can revoke this permission if you wish.
Note that unlike all other data sources in Zing, Google Sheets imports are not ’live’ connections. That is, Zing takes a ‘snapshot’ of the sheet at the time of import but subsequent changes to the sheet will not automatically update in Zing. If you’d really like it to be a live connection, let us know.
Then follow the steps in the next section to add the Google Sheet to Zing.
Enter your Google Sheet URL. Your sheet’s link visiblity must be set to ‘anyone with the link’. Once the sheet is imported, you can revoke this permission if you wish.
Add the name of the table you’d like your sheet to appear as in Zing. This will be searchable in Zing so making this reflect what the table is about will make it easier to find and use.
Tap ‘Save’
Check for any warning messages which might indicate the sheet was incorrectly formatted
The data source you just added will be available to everybody in your organization.
Configure Snowflake as a data source for Zing Data
Snowflake is one of the most commonly used cloud data warehouses, capable of ingesting data from a variety of sources, supporting robust permissioning, and allowing seamless scaling to large data sets.
You can connect Zing to Snowflake as a data source from the Zing web console or from the Zing Data mobile / web apps.
You’ll need:
An active Snowflake account
An active Zing Data account
Setup Steps
Login to the Zing web console, and click on the ‘data sources’ tab
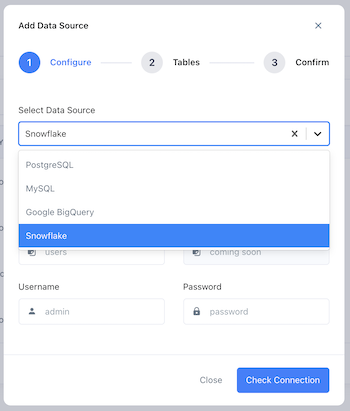
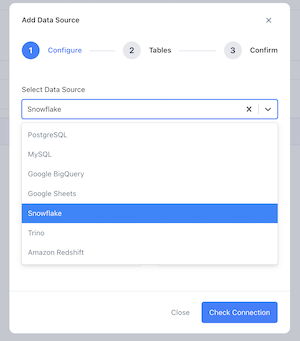
Click ‘New source’
Select ‘Snowflake’ as the data source.
Enter your Snowflake credentials:
Hostname is required. If your snowflake URL is https://aa11111.us-central1.gcp.snowflakecomputing.com, enter the portion following https:// but before .snowflakecomputing.com. So in this example the hostname to enter would be: aa11111.us-central1.gcp
Database is required
Username is required
Password is required unless you are using a private key
Schema is optional
Private Key is optional. This is the contents of your .p8 downloaded from Snowflake if you have key-pair authentication turned on for this username.
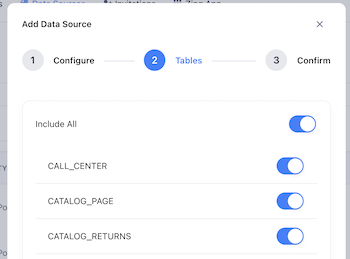
Tap ‘Save’, and Zing will confirm that a connection to the database can be established. A list of all tables in that database will then be shown.
By default, all the tables in your database will be made visible, but you can optionally turn off certain tables from being displayed by turning the switch for an individual table off, then hitting ‘save’.
The data source you just added will be available to everybody in your organization.
Note: Setting up Snowflake with Zing can be done both via the Zing Web Console (as outlined above), or from the Zing Data app, by clicking on the ‘sources’ tab then ‘add a new source’.
Trino is an open source, highly performant, distributed query engine (formerly PrestoSQL). Starburst Enterprise is the enterprise offering of Trino and Starburst Galaxy is the cloud native and fully managed service of the Trino query engine offered by Starburst. Zing Data works with Trino, Starburst Enterprise and Starburst Galaxy.
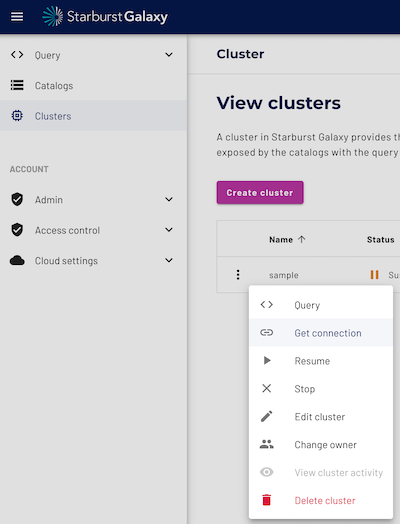
Hostname is the hostname of Trino / Starburst Enterprise / Starburst Galaxy cluster. In Starburst Galaxy it’s in View Clusters » More Details » Get Connection; in Trino it depends on setup; in Starburst Enterprise Product it’s in EKS configurations
Port is the port that your cluster is live on - typically 443 by default for Trino / Starburst Enterprise / Starburst Galaxy, but your port may differ.
Username is…your username. Best practice is to create a read only user.
Password is…your password. If you are using Starburst Galaxy, this will be the password you use to login to Starburst’s web portal. Zing will encrypt this.
Catalog is the data source within your Trino/Starburst cluster you would like to connect to. Read more here.
Schema defines a set of tables that can be queried. Read more here.
Database Name can be any value - it is just how the name data source appears in Zing but isn’t used to connect to your cluster
Right now, Trino data sources must be set up on web (but are accessible across both Zing Web and Zing Mobile apps).
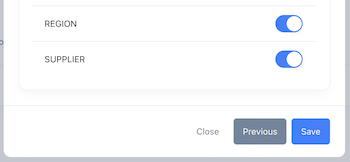
Choose if you’d like to make all tables in your schema visible, or if you’d like to select only certain tables to be visible.
Tap ‘Save’
The data source you just added will be available to everybody in your organization.
9 - Databricks
Configure Databricks as a data source for Zing Data
Databricks is cloud data platform and is an outgrowth of Apache Spark. It can run on Amazon Web Services, Microsoft Azure, or Google Cloud Platform.
You can connect Zing to Databricks as a data source from the Zing web console (and from the Zing mobile / web apps soon!).
You’ll need:
An active Databricks environment
An active Zing Data account
Setup Steps
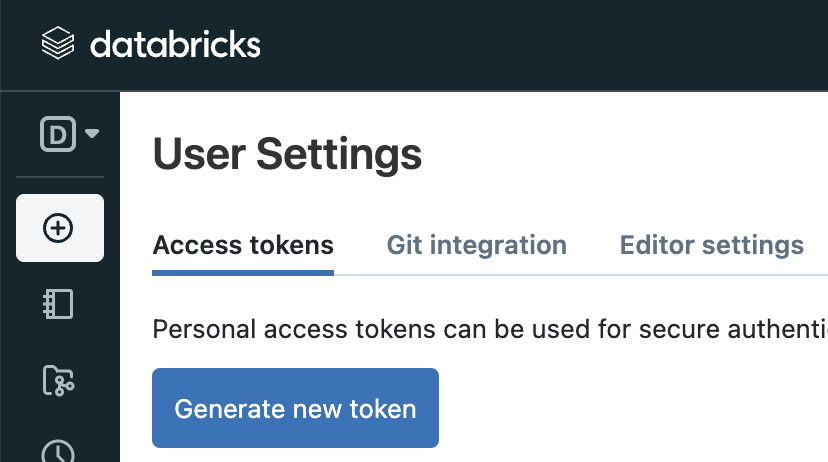
Login to your Databricks web console and go to ‘User Settings’ at the top right
Under ‘Access Tokens’, click on ‘Generate new token’. Make sure you save it somewhere safe.
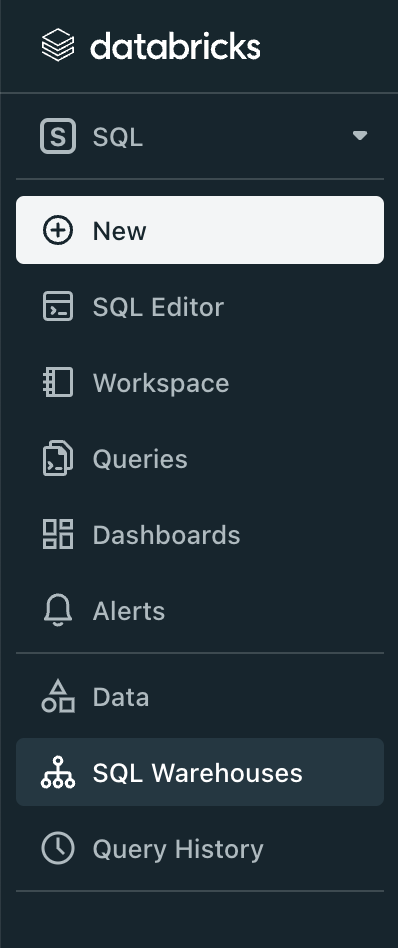
In the left-hand menu, switch to the ‘SQL’ context and click on ‘SQL Warehouses’.
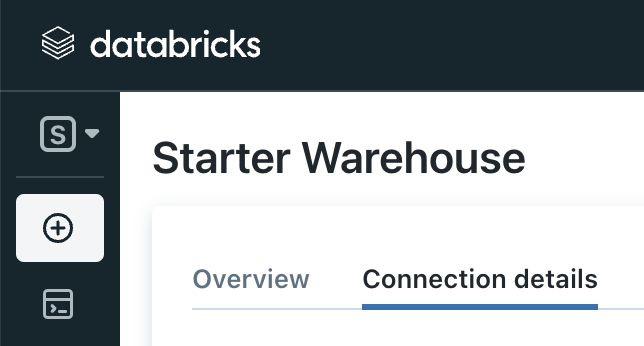
From the list of warehouses, choose the one you want to query in ZingData and click on it.
Switch to the ‘Connection details’ tab and save the displayed info, we will be using it shortly.
Login to the Zing web console, and click on the ‘data sources’ tab.
Click ‘New datasource’.
Select ‘Databricks’ as the data source.
Enter your Databricks host, port, path and token gathered in steps 2 and 5 above.
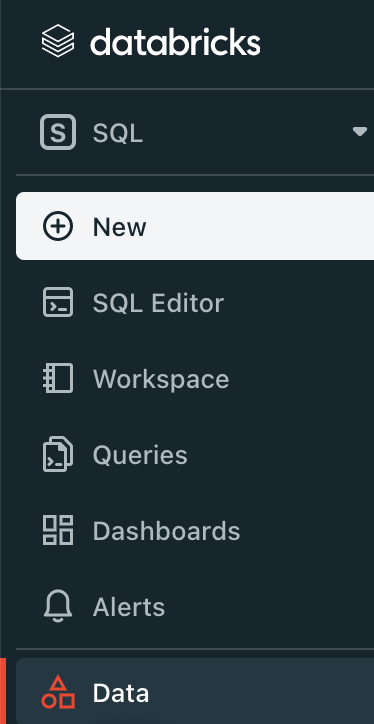
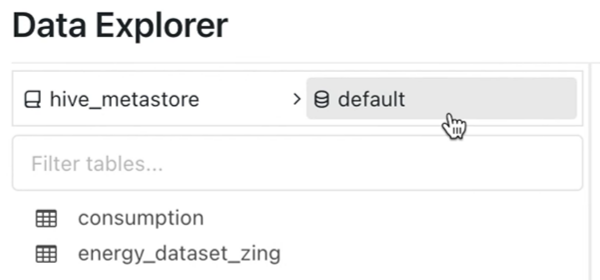
Your Databricks schema can be found in Databricks by clicking ‘Data’ on the lefthand navigation and then looking under ‘Data Explorer’. Enter this into Zing.
Tap ‘Save’, and Zing will confirm that a connection can be established. A list of all tables in that database will then be shown.
11. By default, all the tables in your database will be made visible, but you can optionally turn off certain tables from being displayed by turning the switch for an individual table off, then hitting ‘save’.
12. The data source you just added will be available to everybody in your organization.
A step by step video is here:
10 - Mozart Data
Configure Mozart Data with Zing
While Zing supports common databases, if you want to connect Zing to CRM, ERP, and ads reporting systems you’ll likely want to use a third party that pulls in data from each source, standardizes it, and makes it easily queryable.
Mozart Data supports more than 300 data sources and allows for join operations across data sources, making the transformed data available to Zing as a Snowflake data source. Mozart Data supports:
Sendgrid
Square
Stripe
Amplitude
Quickbooks
Workday
Google Analytics
Facebook Ads
Hundreds of others
To connect Zing Data to Mozart Data, you’ll need:
A Mozart Data Account which is free for a 14 day trial period
A Zing Data Account
Once you’ve created both accounts
Go to the Zing web console and click the ‘Data Sources’ tab then ‘Add Datasource’
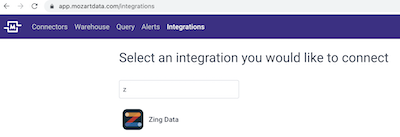
Go to the ‘Integrations’ tab, then click ‘Zing Data’
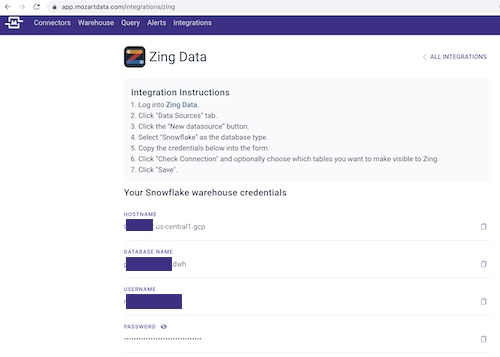
This will display your connection information to copy + paste into Zing Data using the a ‘Snowflake’ data type
Hostname
Database Name
User Name
Password
Once you’ve entered all credentials into Zing, tap check connection and you’ll see a list of all tables from Mozart. If you want to limit which tables are visible, you can ’turn off’ some of the tables and they’ll not be visible to you or other users in your organization in the Zing UI.
Click ‘Save’ in the bottom right and the data source will be added. It will now appear in the ‘sources’ tab in the Zing app, and on the homescreen of the Zing app.
11 - Supabase
Configure Supabase as a data source for Zing Data
Supabase is an open-source Firebase alternative that provides a Postgres database, Authentication, instant APIs, Edge Functions, and more. It allows developers to build scalable backends quickly.
You can connect Zing to Supabase as a data source from the Zing web console.
You’ll need:
An active Supabase project
An active Zing Data account
Setup Steps
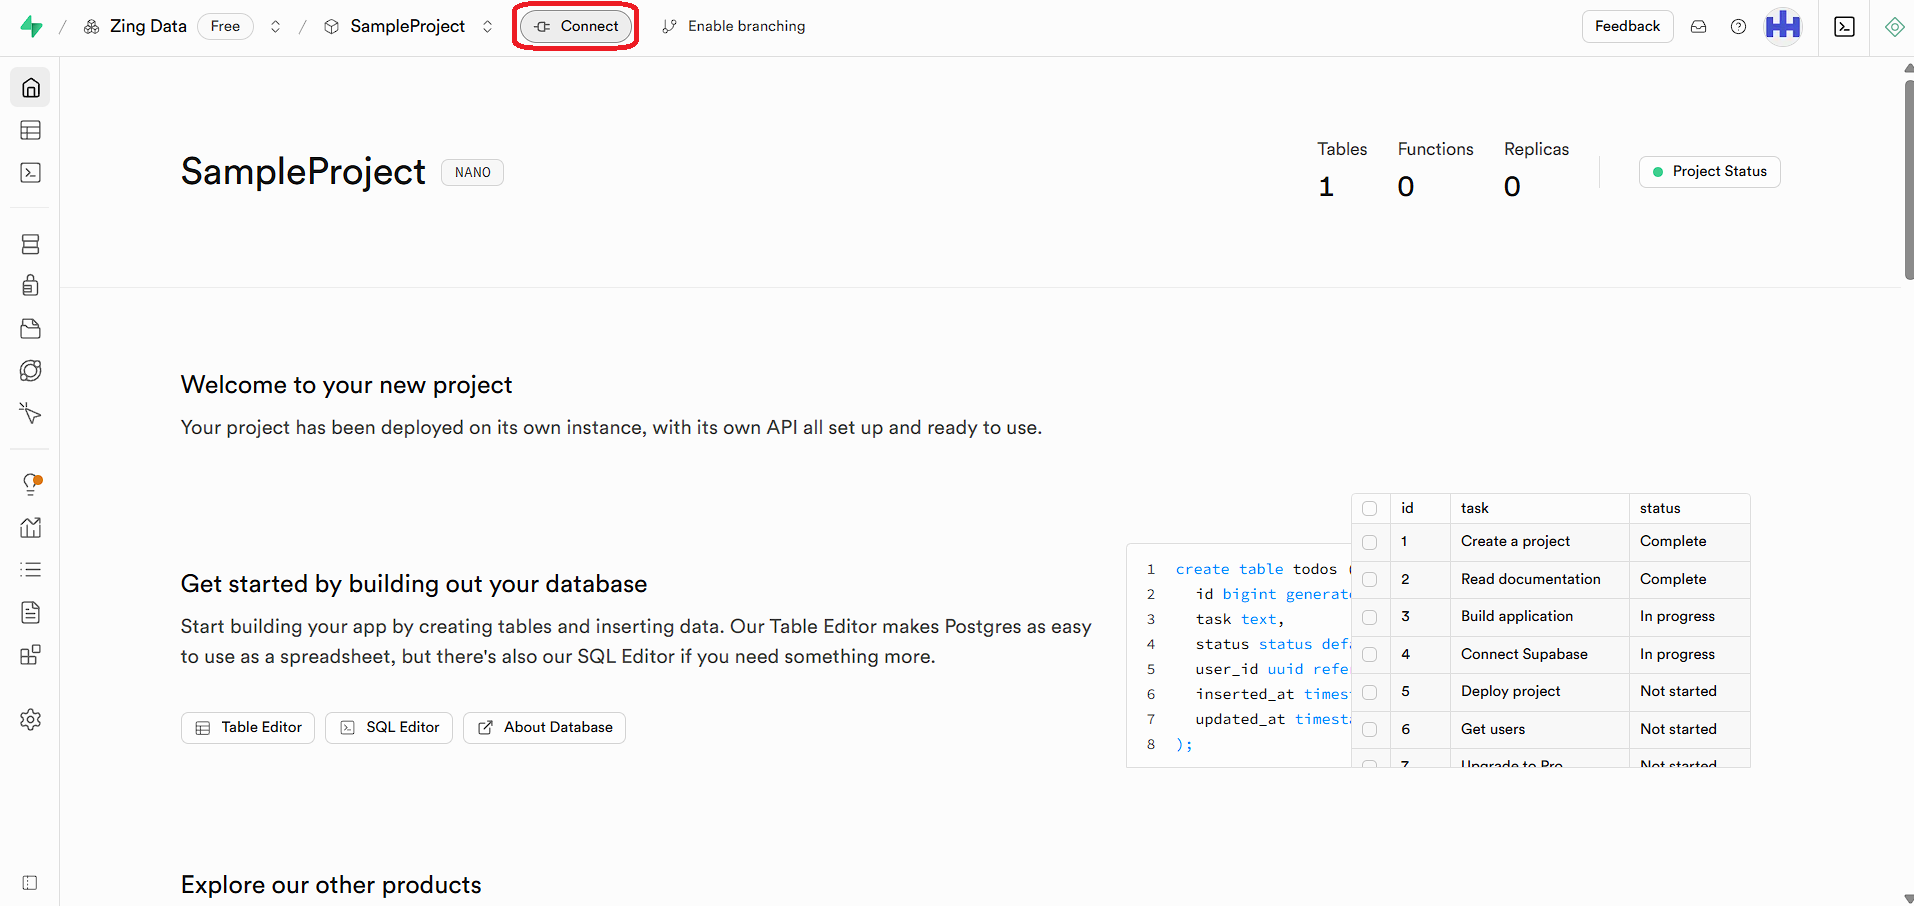
Login to your Supabase project dashboard.
In the top navigation bar, click on Connect.
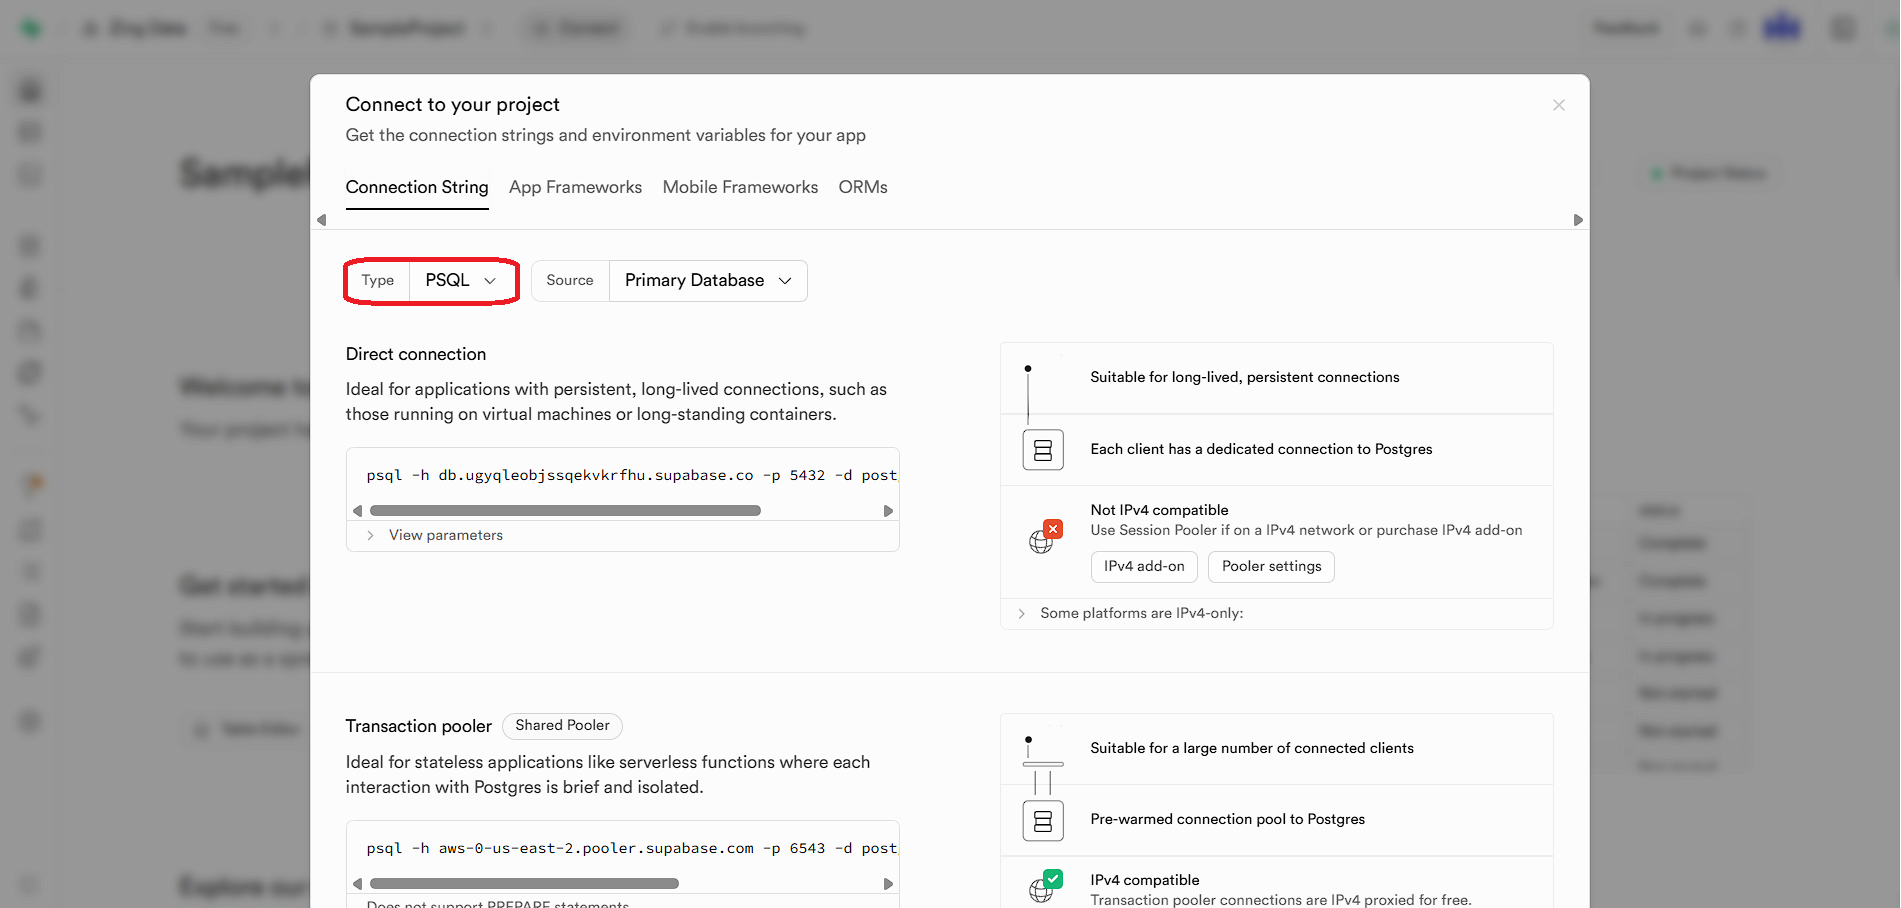
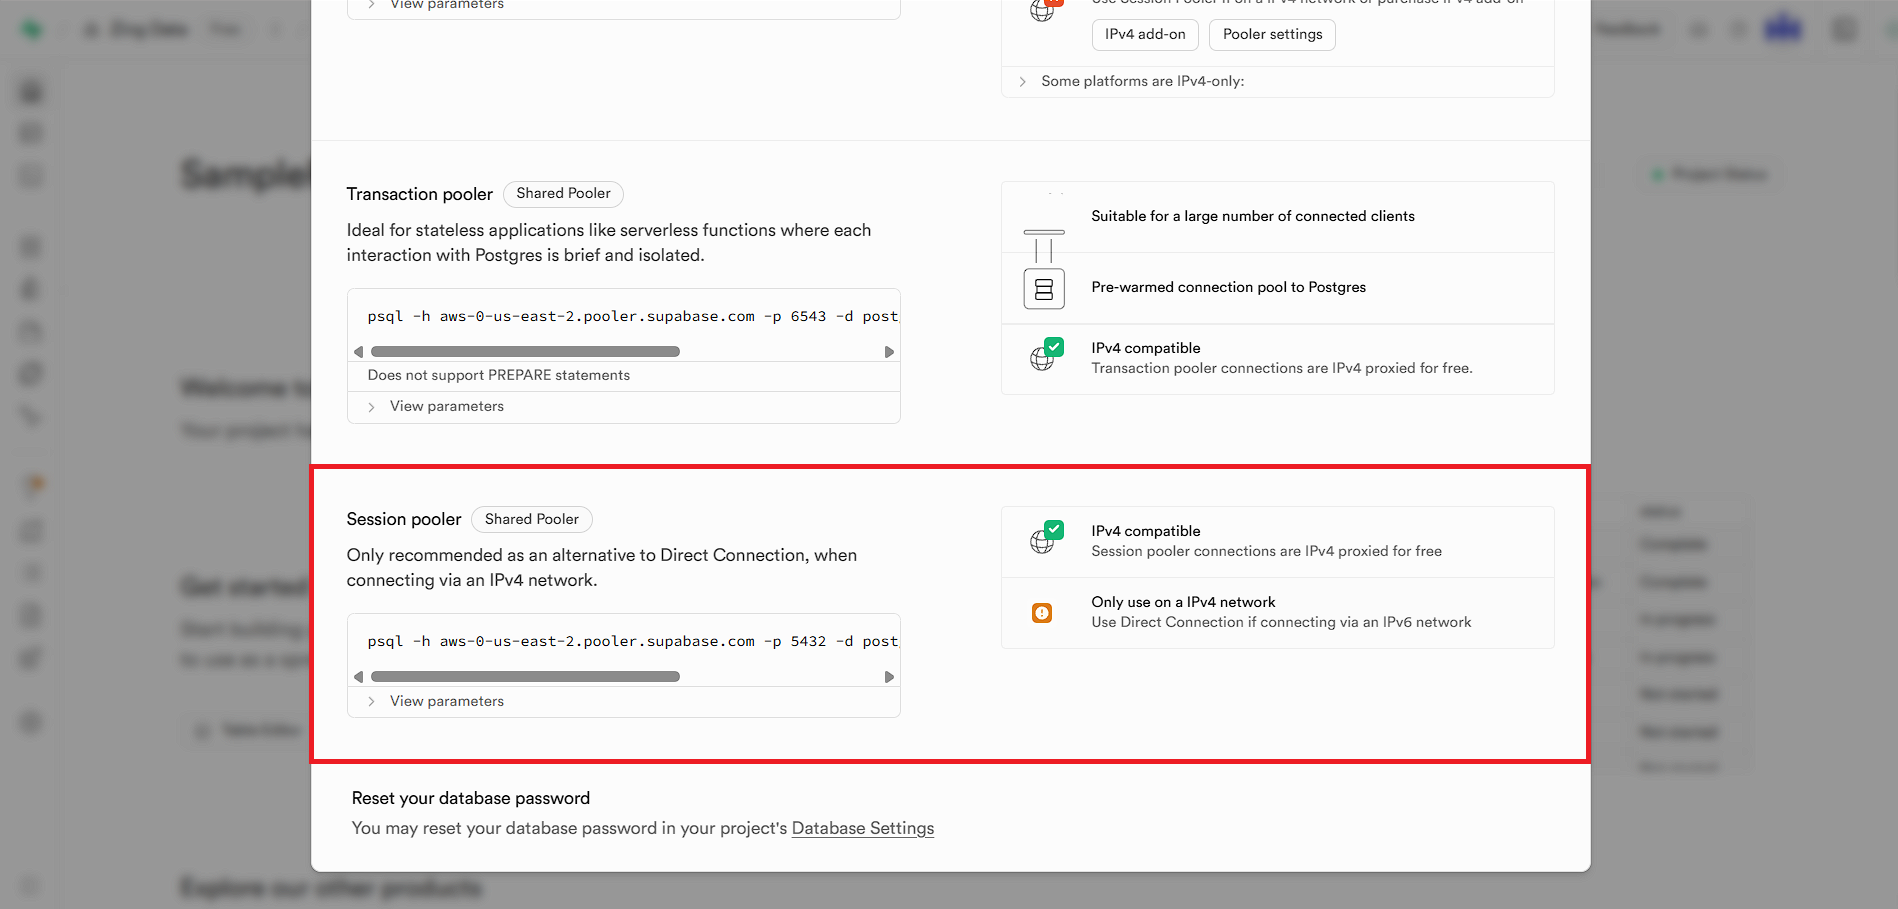
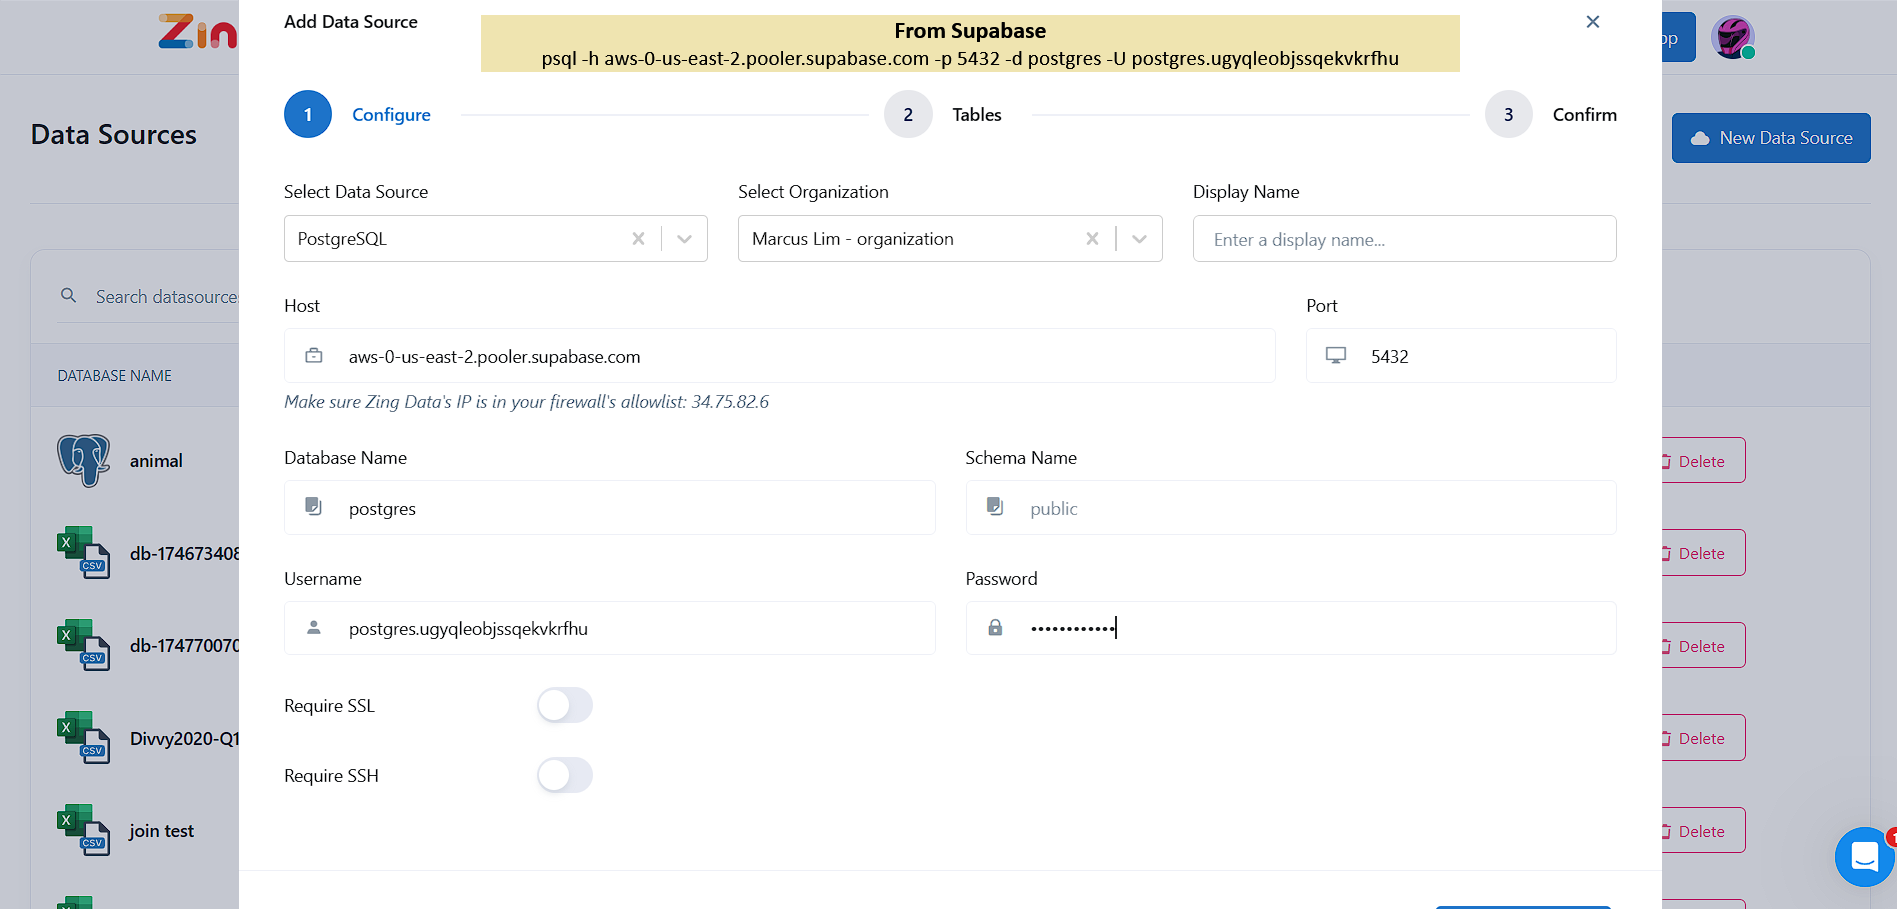
Under the “Connection String” section, select PSQL as the “Type”. Locate the Connection string for your database. You’ll typically find options for direct connection, session pooler, and transaction pooler. For general data visualization, the Session pooler connection string is often recommended.
Copy and save this connection string somewhere safe. It will contain your host, port, database name and username.
Login to the Zing web console, and click on the ‘data sources’ tab.
Click ‘New Data Source’.
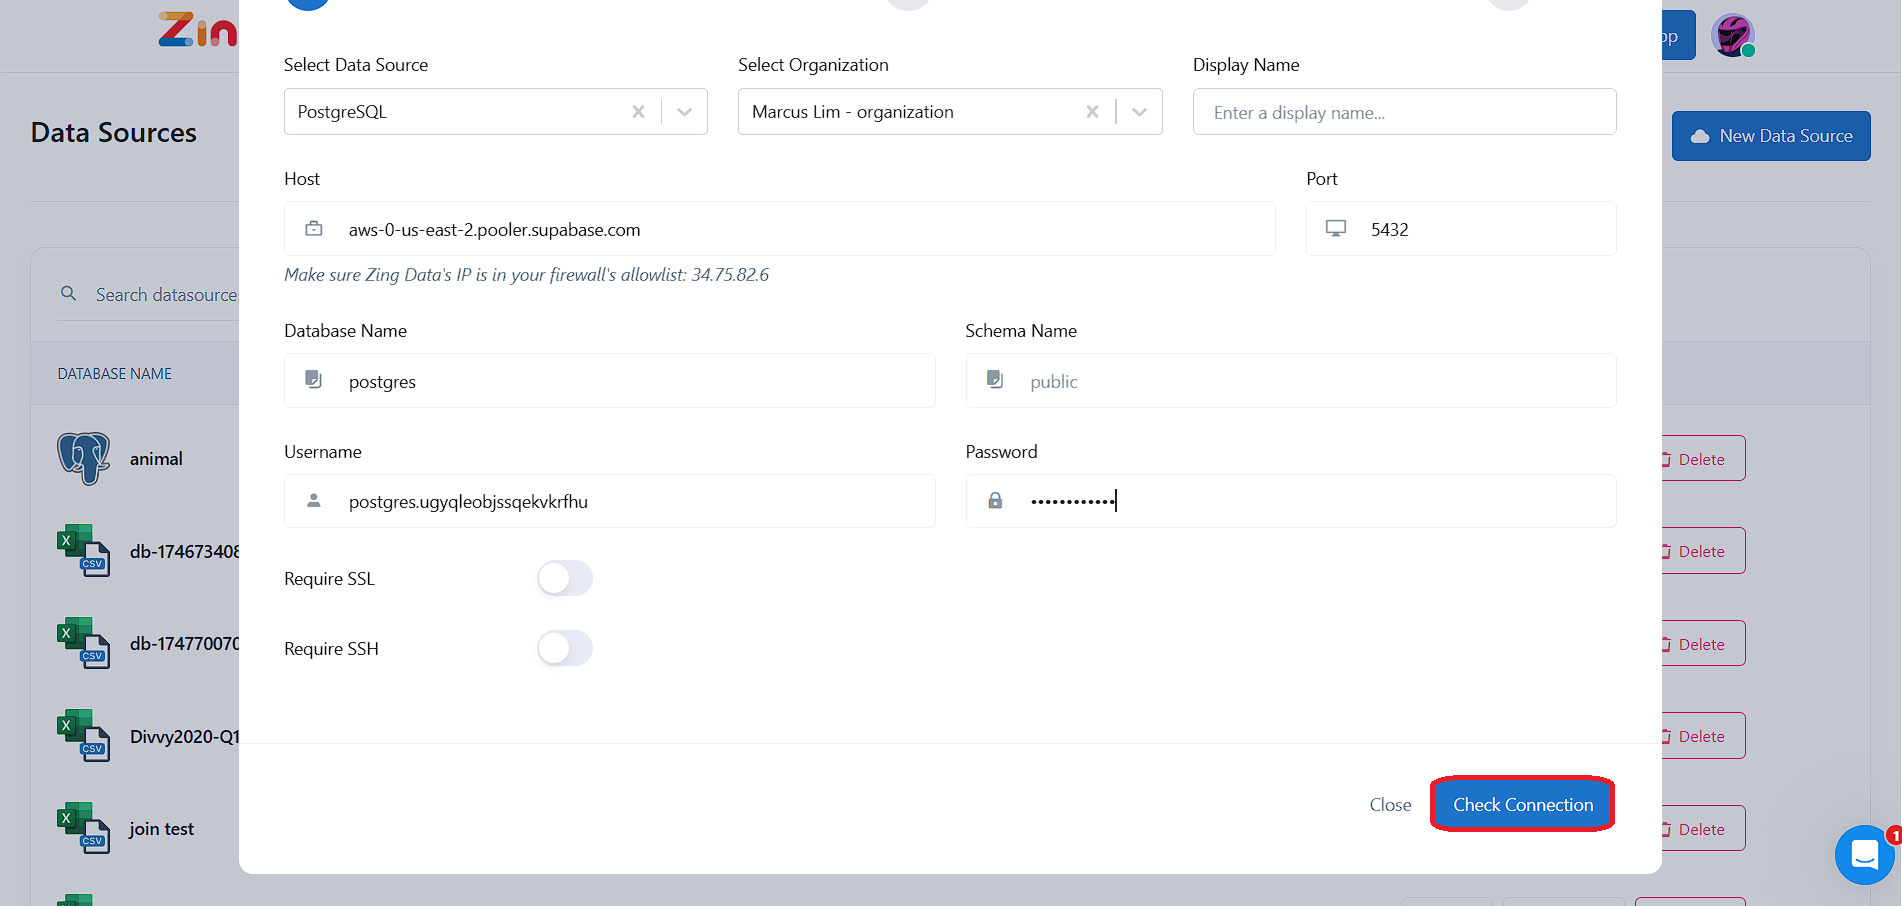
Select ‘PostgreSQL’ as the data source.
Enter the Host, Port, User, Password, and Database Name gathered from your Supabase connection string in step 4. Take note: Database Password is the password used on creation of the Project.
Steps to Reset Database Password - head to Project Settings, under Database tab, select Reset database password in the Database password section.
Tap ‘Check Connection’, and Zing will confirm that a connection can be established. A list of all tables in that database will then be shown.
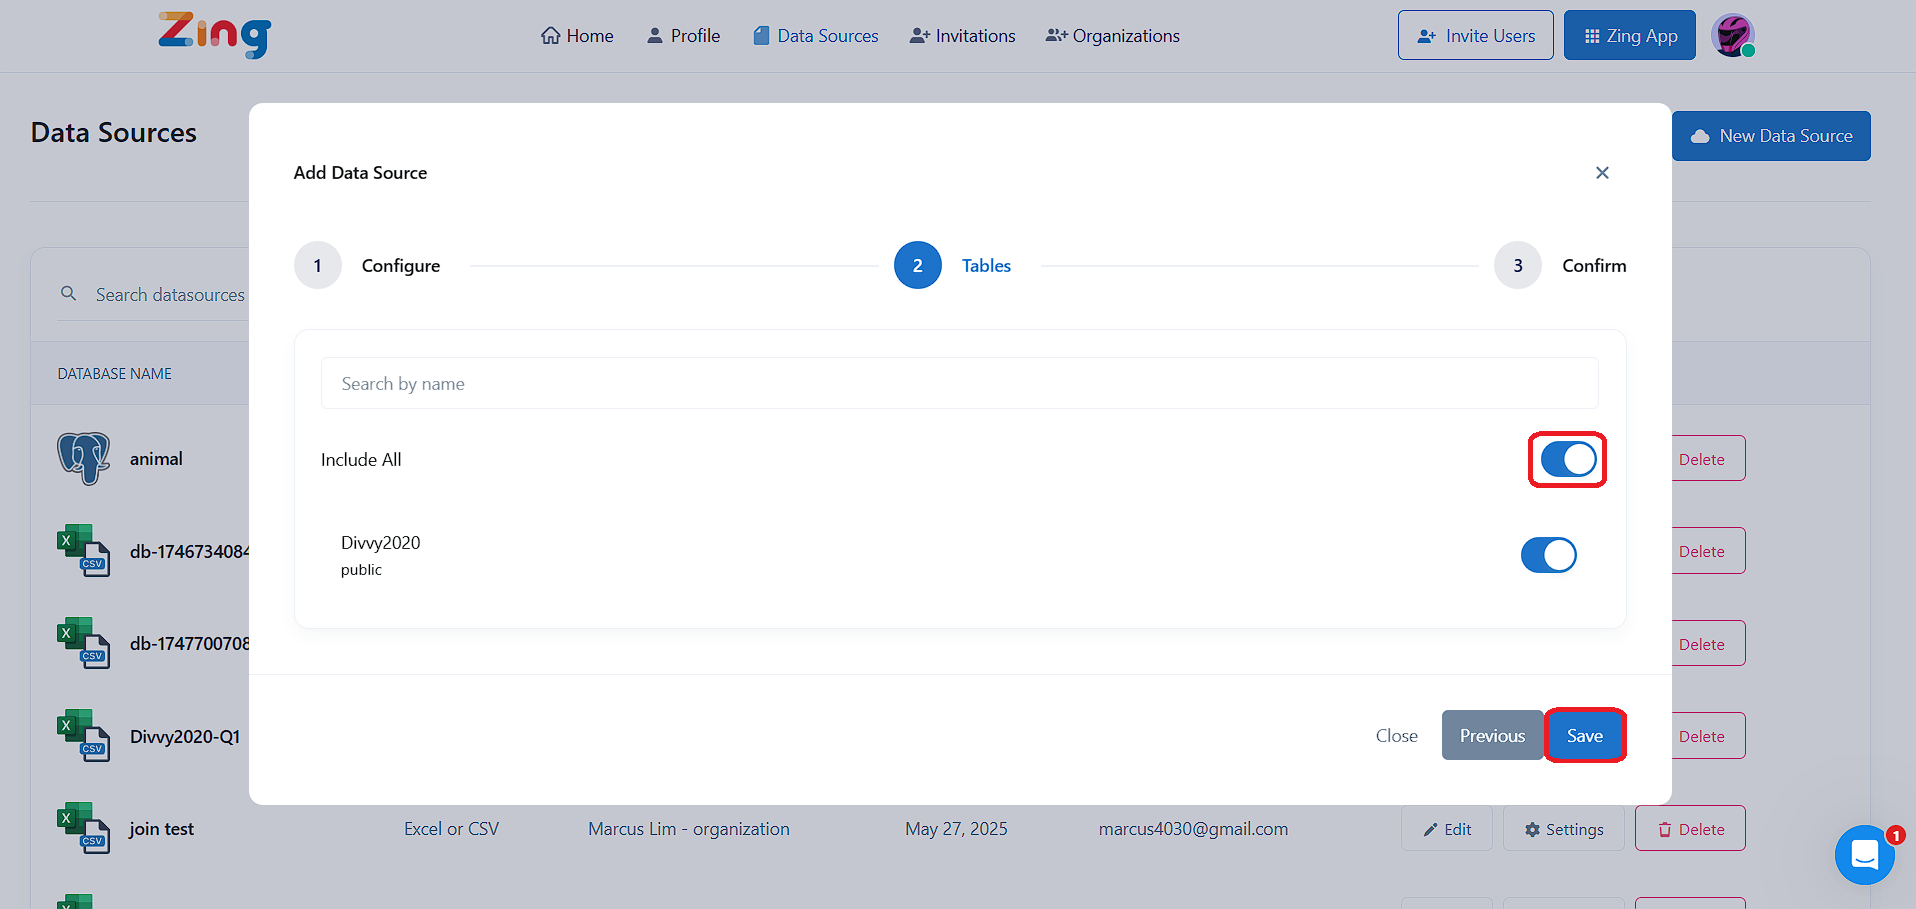
By default, all the tables in your database will be made visible, but you can optionally turn off certain tables from being displayed by turning the switch for an individual table off, then hitting ‘save’.
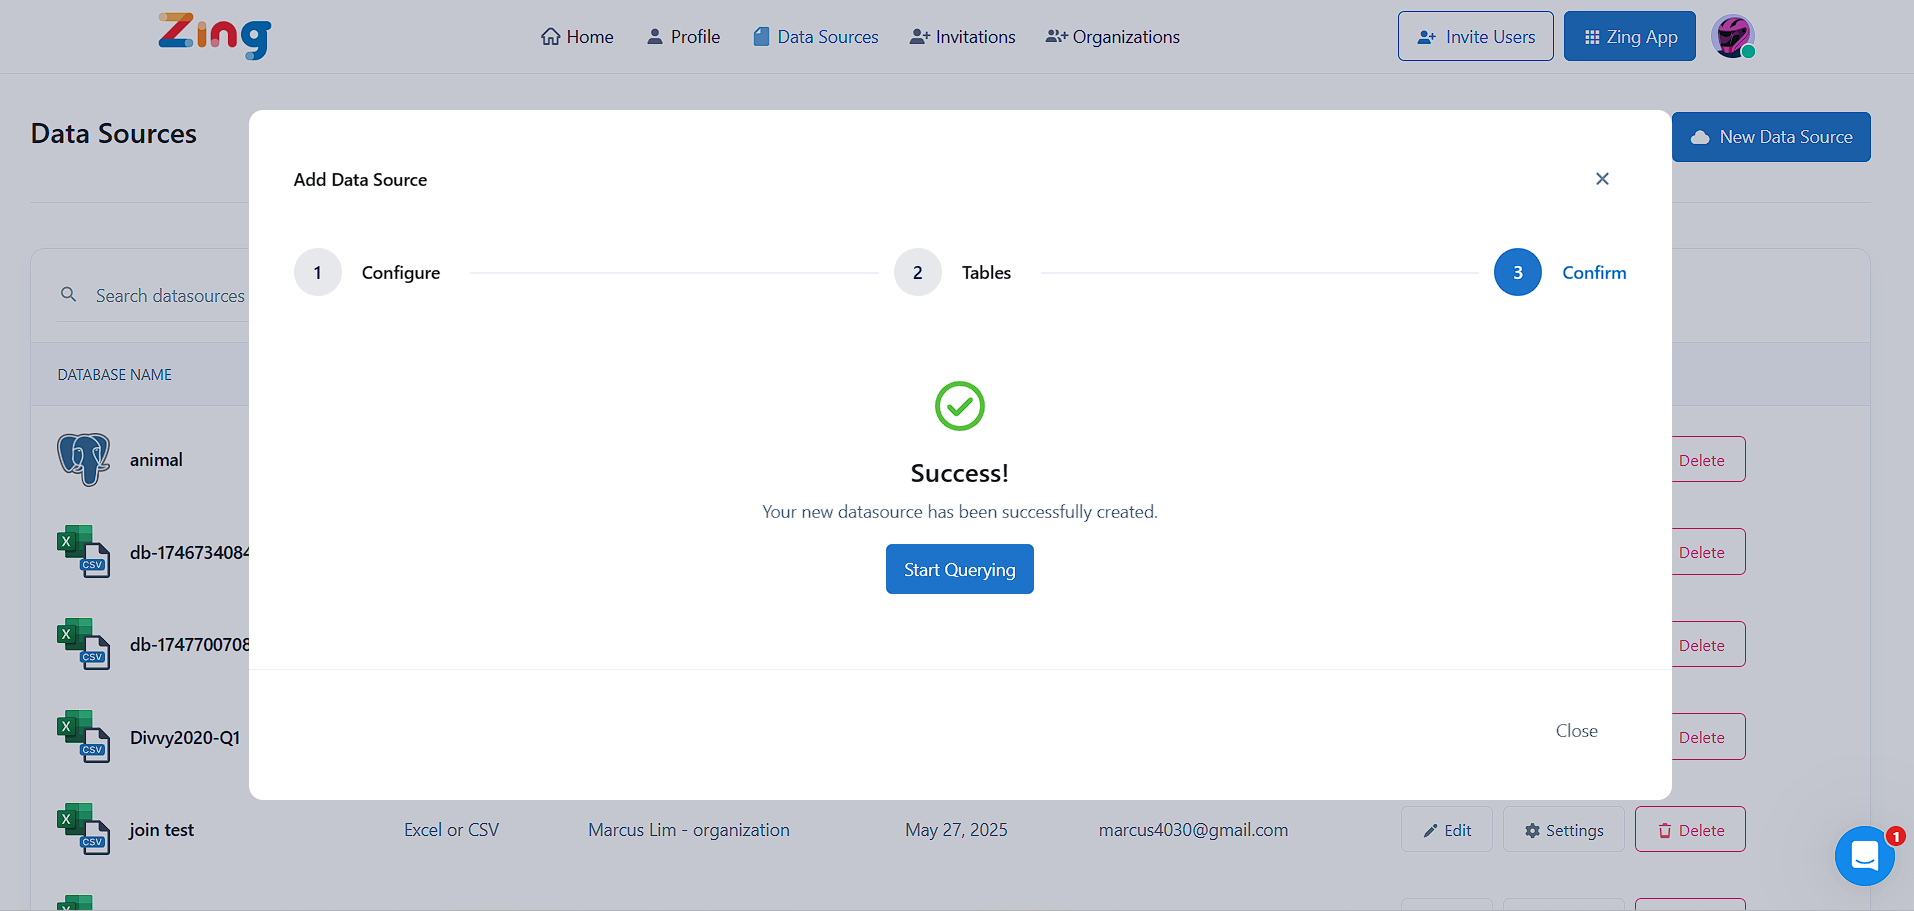
The data source you just added will be available to everybody in your organization.
A step by step video is here:
12 - Amazon Redshift
Configure Amazon Redshift with Zing
Amazon Redshift is a widely used cloud data warehouse, hosted on AWS and configurable as either a cluster where you define setup parameters, or a ‘serverless’ set-up.
You can connect Zing to your Redshift cluster from either the Zing web console, and then can access it via the Zing web app, iOS app, or Android.
You’ll need:
Hostname which is the publicly accessible IP or URL for your Redshift database. Note that you’ll need to set your database to be publicly accessible.
Port which is the port that your database is live on – typically 5439 by default for Redshift, but your port may differ
Database Name which is the name on your hostname IP / URL you database is referenced by
Username which is…your database (NOT AWS!) username. Best practice is to create a read only user
Password which is…your password. Once you enter this, Zing will automatically encrypt this.
If you’ve not already created a Redshift cluster and made it accessible to a data querying tool outside youur VPC, you’ll need to:
Create a Virtual Private Cloud (VPC) – the default VPC is fine.
Create a subnet group
Expose a public IP (often using ElasticIP), allocate it, and connect it to your Redshift instance
Set your Redshift cluster to ‘publicly accessible’ and connect it to the IP you’ll expose to the internet via a routing table
Ensure your security group allows connections from IPv4 connections from the internet (or better, just from Zing’s IP specifically: 34.75.82.6 )
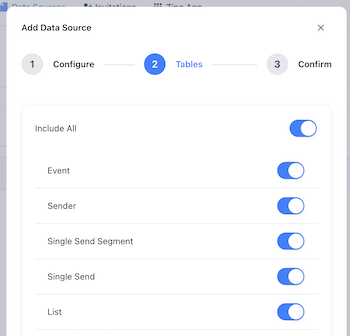
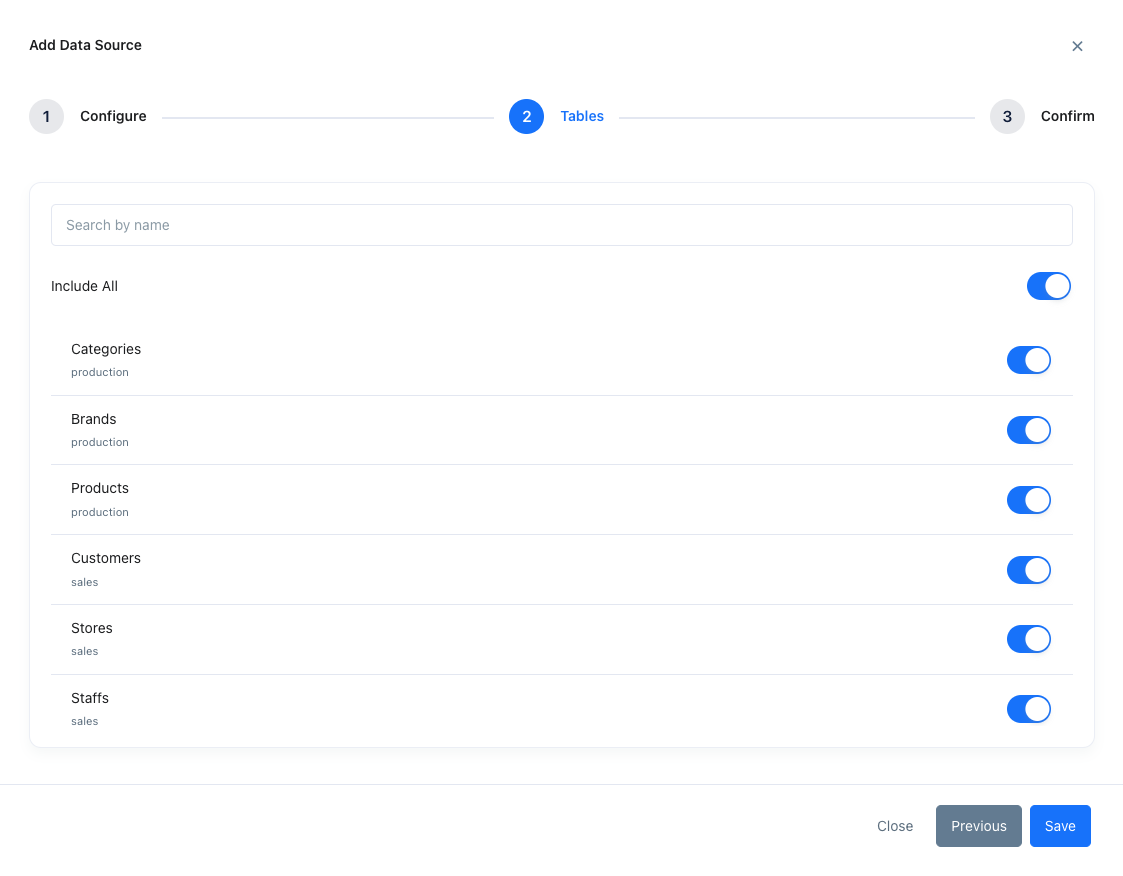
You’ll see a list of tables and views which you can allow Zing to access. By default ‘Include All’ is turned on which means all database tables will be visible to Zing. But if you’d like you can select a subset of tables to make visible to Zing.
Tap ‘Save’
Once you see that your connection has been successfully saved, tap ‘Close’
The data source you just added will be available to everybody in your organization.
Zing will verify that it can connect to your data source and if successful, add it as a source. If Zing cannot connect to your data source, you'll see a message asking your to check your credentials and retry. If even after checking your credentials and retrying you still experience issues, reach out to Zing support here
13 - Microsoft SQL Server
Configure MS SQL Server with Zing
Microsoft SQL Server is one of the most widely used databases for enterprise deployments, developed by Microsoft. MS SQL is scalable and includes ETL (Extract, Transform and Load) tools and reporting services.
You can connect Zing to your MS SQL database from the Zing web console.
You’ll need:
Hostname, which is the URL or IP address of your database
Database Name, which is the name on your hostname IP / URL, your database is referenced by
Username, which is your username. Best practice is to create a read only user
Password, which is your password. Once you enter this, Zing will automatically encrypt this.
Depending on your setup, you may need to set up port port forwarding on your router for port 1433 (assuming you are using the SQL Server default port) to the server your database resides on
Ensure that TCP/IP protocol is enabled on SQL server (instructions here)
Tap ‘Check Connection’
Zing will verify that it can connect to your data source and if successful, add it as a source. If Zing cannot connect to your data source, you'll see a message asking your to check your credentials and retry. If even after checking your credentials and retrying you still experience issues, reach out to Zing support here
Choose the tables you want to include and tap ‘Save’.
The data source you just added will be available to everybody in your organization.
14 - Clickhouse
Configure Clickhouse with Zing
Clickhouse is an open-source database management system (DBMS) for online analytical processing (OLAP). It uses a column-based structure. Clickhouse was designed to be fast and highly-scalable. Clickhouse stands out for high performance because it gives attention to low level details when performing queries.
You can connect Zing to your Clickhouse database from the Zing web console.
You’ll need:
Hostname, which is the URL or IP address of your database
Database Name, which is the name on your hostname IP / URL, your database is referenced by
Username, which is your username. Best practice is to create a read only user
Password, which is your password. Once you enter this, Zing will automatically encrypt this.
If you require the connection to be secure, three additional fields would be required:
Server Root Certificate
Client Key
Client Certificate
The Clickhouse documentation provides more information about generating certificates to connect via SSL.
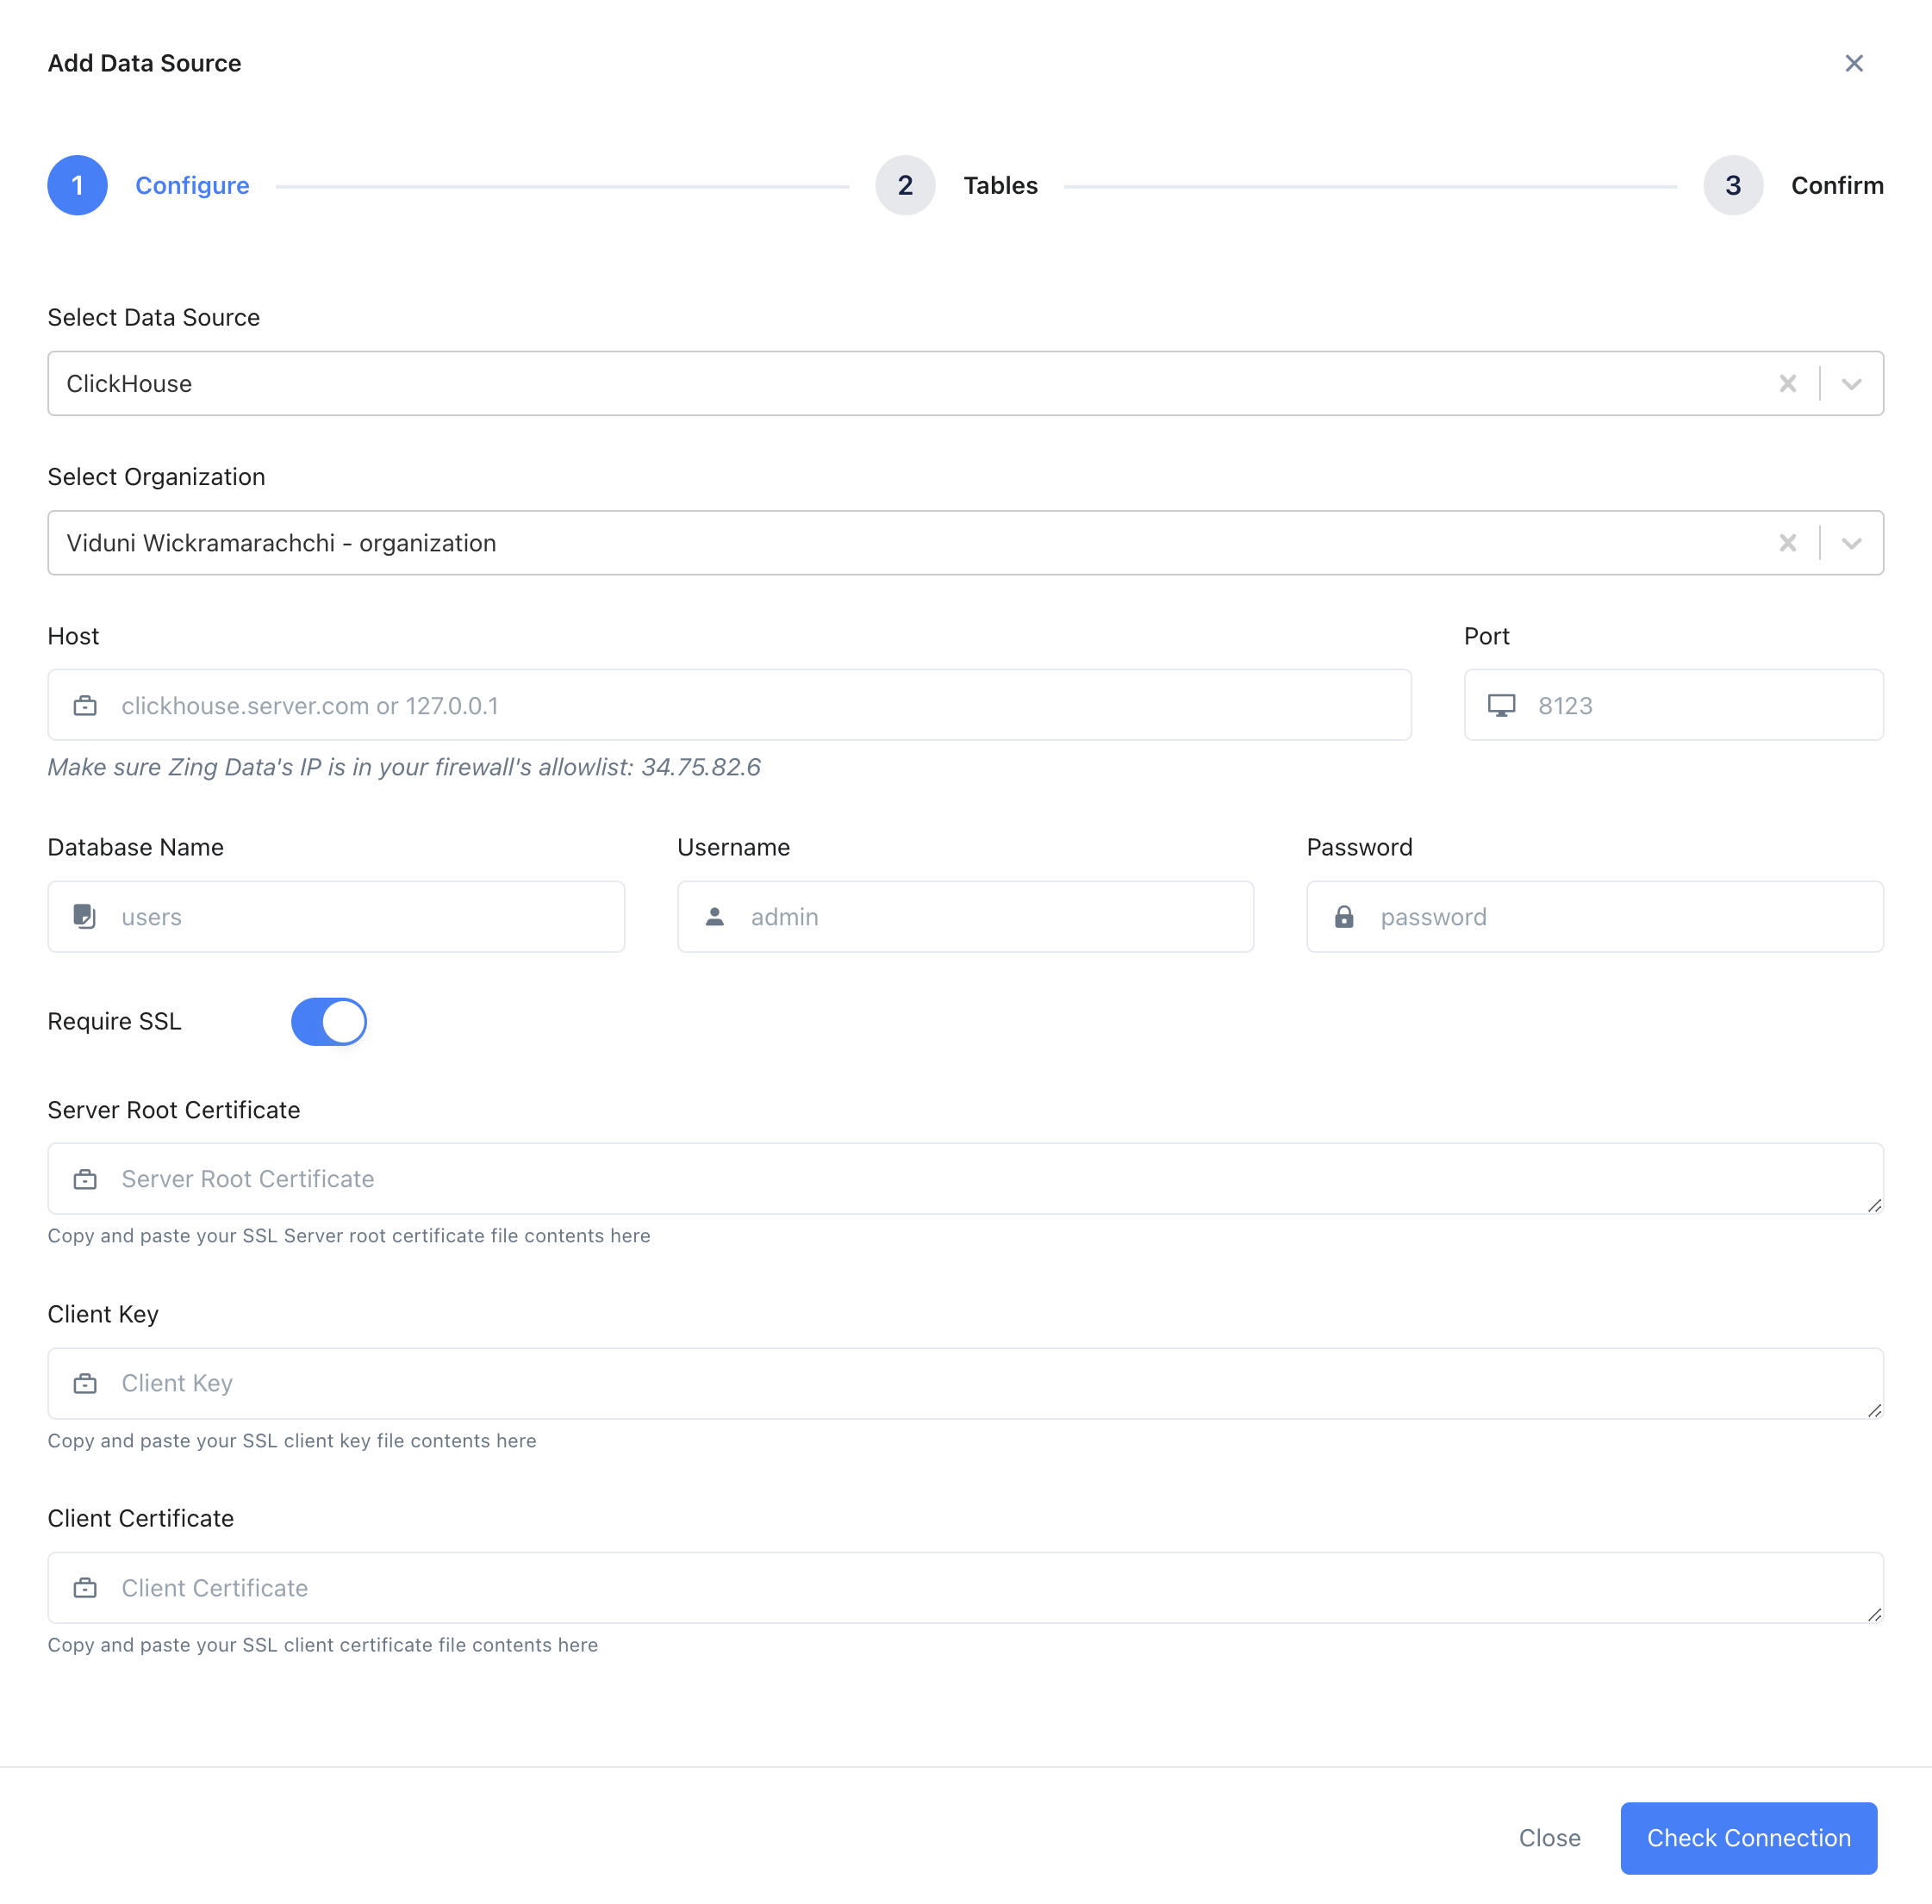
Enter your Clickhouse credentials, as outlined above.
If you are connecting to Clickhouse Cloud, you’ll typically want to use port 8443 and ‘use SSL’. Your connection host will be something like https://xxxxx123.us-east-1.aws.clickhouse.cloud
If your Clickhouse database is behind a firewall (which it typically will be), you’ll need to allow connections from Zing’s IP address: 34.75.82.6
Tap ‘Check Connection’
Zing will verify that it can connect to your data source and if successful, add it as a source. If Zing cannot connect to your data source, you'll see a message asking your to check your credentials and retry. If even after checking your credentials and retrying you still experience issues, reach out to Zing support here
No preview available
Unknown Shortcode
contact
No preview available
Unknown Shortcode
contact
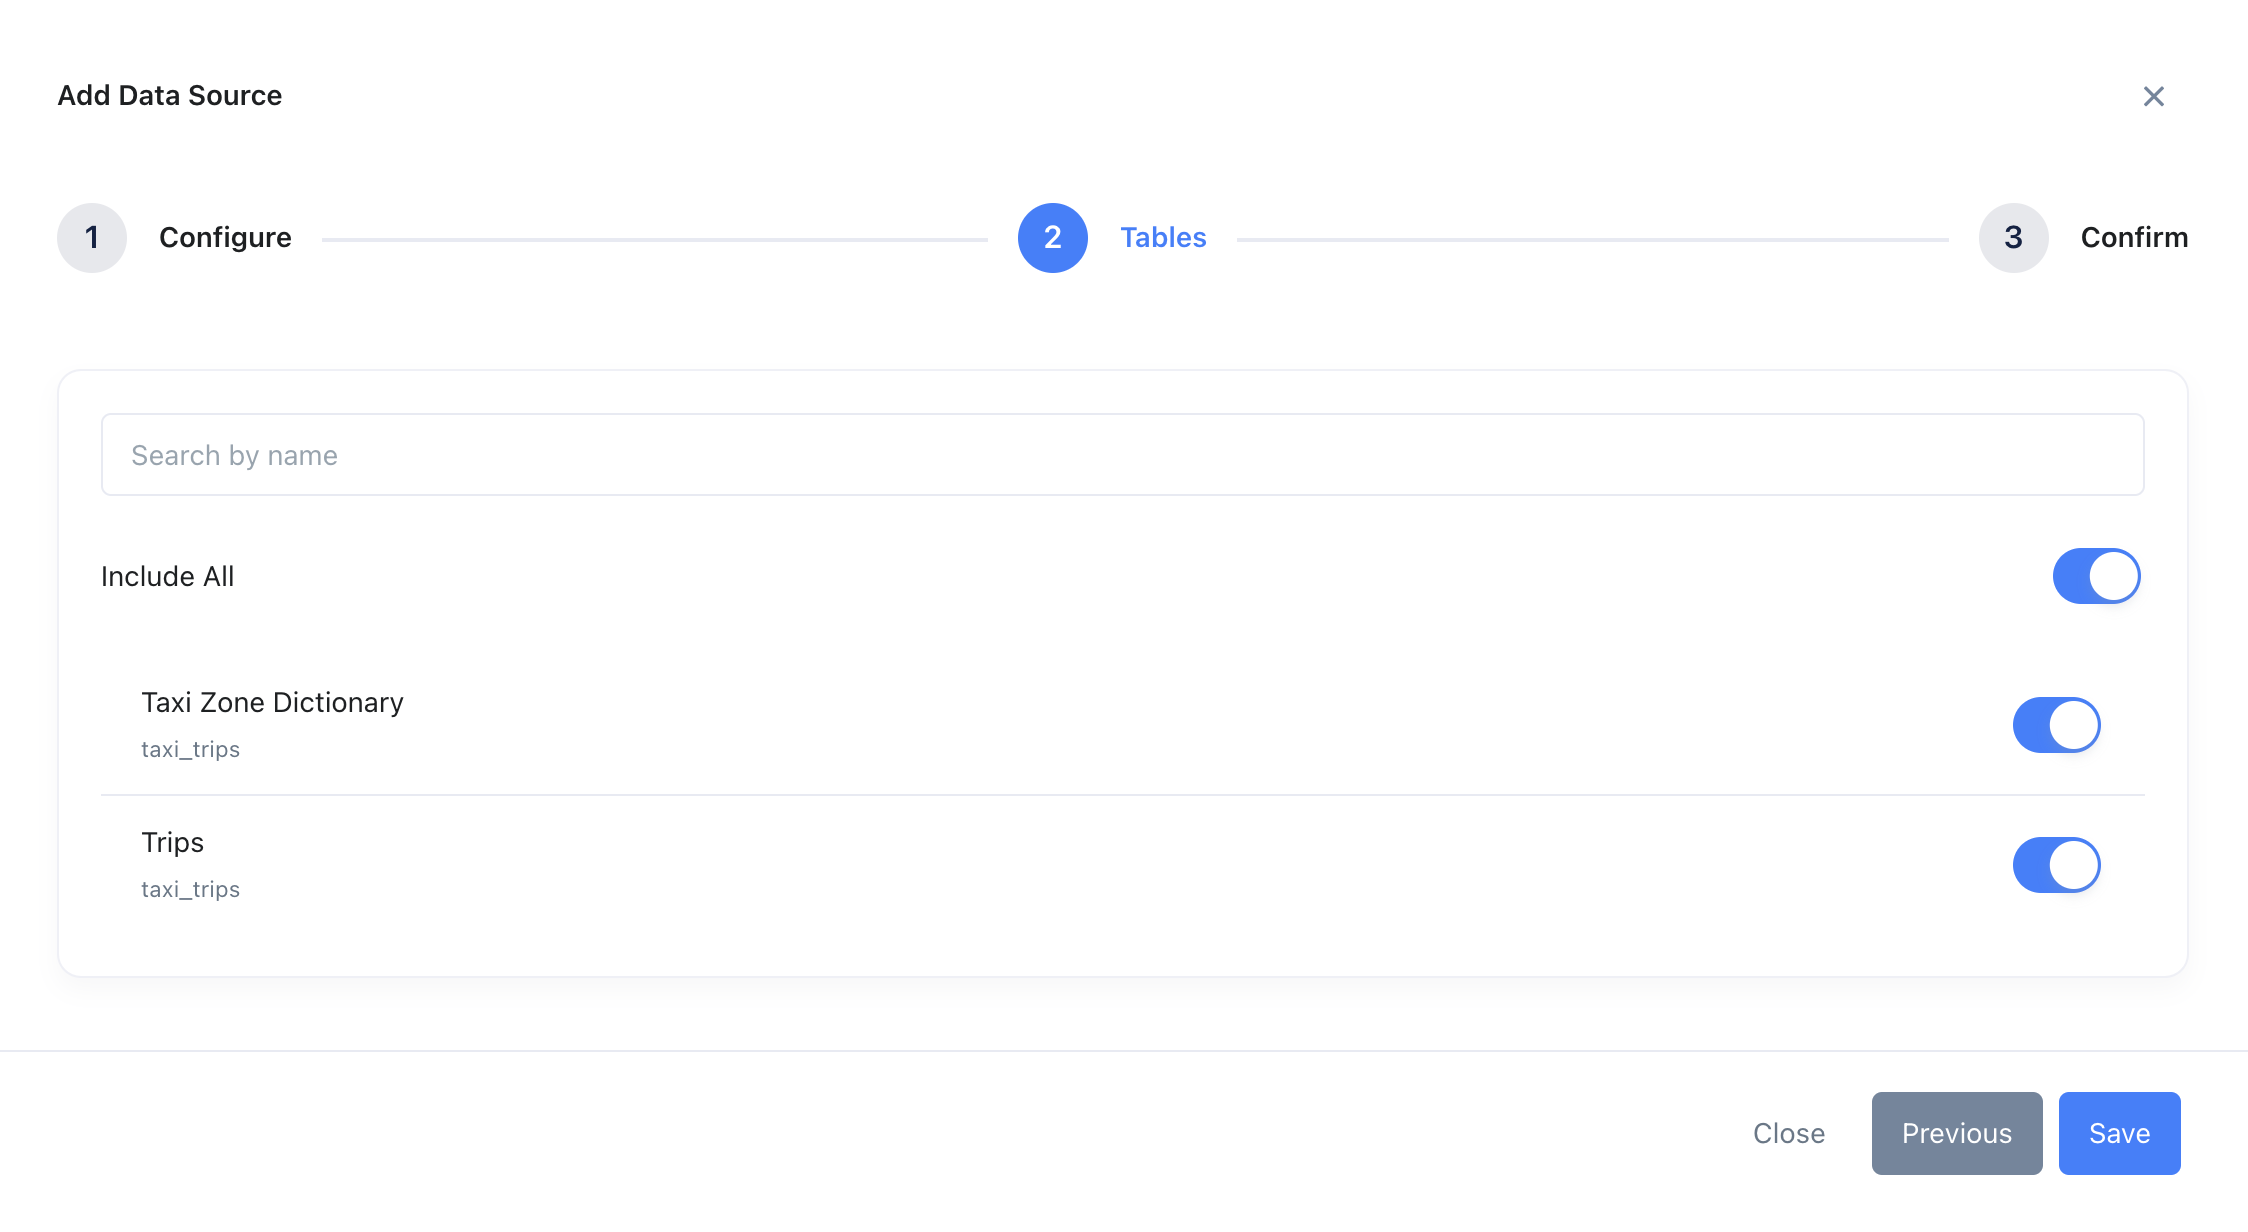
Choose the tables you want to include and tap ‘Save’.
The data source you just added will be available to everybody in your organization.
15 - Amplitude
Configure Amplitude with Zing Data
Amplitude Analytics is one of the broadly used tools for storing user events, generating cohorts, and taking a deeper look into user journeys throughout your app or website.
But having this data live only in Amplitude, visible and queryable only from a computer limits your team’s ability to understand what is happening with users in real-time.
Step 1: Syncing Amplitude Data to Google BigQuery (or Snowflake / Redshift)
Login to Amplitude, then click the Data tab, then Destinations tab.
Click new destination and select BigQuery, Snowflake, or Redshift
Select the data you’d like to export export frequency
Review the schema and click Next.
Specify the dataset in the cloud data warehouse to receive your Amplitude data. If you’re connecting to Google BigQuery, upload the service account key file. This file must be in JSON format. Instructions for creating a service account in BigQuery with the appropriate permissions are here.
Click Next. Amplitude connects to your warehouse upload is successful, click Finish to complete the process.
Step 2: Set up BigQuery (or Snowflake / Redshift) with Zing Data
Configure Google Analytics 4 (GA4) with Zing Data via BigQuery
Google Analytics 4 (GA4) is a supported data source for Zing Data, via a BigQuery connection. This lets you leverage Zing Data for streamlined query generation, mobile access, dashboard creation, and real-time alerts on top of your GA4 data.
First ensure that your website has Google Analytics 4 properly configured. GA4 offers a wealth of user behavior data that you’ll be tapping into. Once your GA4 account is in place, proceed to the Google Analytics dashboard at analytics.google.com.
Step 2: Create a BigQuery Project
If you don’t have a BigQuery project, head over to cloud.google.com and create one (free tier available).
Enable the BigQuery API for your project.
Step 3: Link Google Analytics 4 to BigQuery
Navigate to the Admin section in Google Analytics.
Scroll down and locate “BigQuery Link” under “Data Streams.”
Click “Link” to establish a connection between your GA4 account and BigQuery.
Step 4: Wait 24-48 hours
GA4 data does not immediately sync to BigQuery and it can take even a few days (more than 24 hours from our testing) before you start seeing GA4 tables and events in BigQuery.
Step 5: Set up a view with data from all individual days of events
Within the BigQuery section of cloud.google.com, click **new query **from one of the event tables which has been populated by GA4. It will look something like events_20230817 or events_intraday_20230817
Create a query with the following text, then save and save as view
SELECT * FROM ‘<PROJECT_ID>.<DATASOURCE_ID>.events_*`
This combines all daily events tables to make them queryable as a single table, similar to a UNION ALL of the events_day1, events_day2, etc.
Step 6: Configure a Service Account for BigQuery
Access the “Credentials” section under “APIs & Services” in Google Cloud.
Create a new service account, granting it necessary permissions (e.g., BigQuery Data Viewer, BigQuery Job User).
Download the service account JSON file containing credentials.
Step 7: Connect Zing Data to BigQuery
Log in to Zing Data.
Connect Zing Data to your Google BigQuery project using the service account details.
Select the desired datasets and tables
Step 8: Craft Data Queries with Zing Data
From the Zing Data home screen, click on the events view you created in step 5
Leverage natural language to generate queries for your GA4 data by typing in the search bar at the top.
Access these queries via your mobile device for on-the-go insights.
Combine queried data to create meaningful dashboards and visualizations by adding questions to a dashboard.
Set up real-time alerts based on specific data thresholds by tapping the top right three dots on any question with a time series.
Conclusion
By connecting Google Analytics 4 with BigQuery and Zing Data, you’ve unlocked a powerful mechanism for harnessing insights from user behavior with the flexible power of natural language querying, SQL, or easy visual querying with SwiftQuery.
This integration empowers you to analyze trends, track performance, and make informed decisions for your business, all while enjoying the convenience of natural language query generation, mobile access, and real-time alerts. Best of all, the free tiers offered by BigQuery and Zing Data make this powerful capability accessible to businesses of all sizes.
Note:
Setting up Google BigQuery with Zing must be done using the Zing Web Console.