Google Sheets
Google Sheets is a widely used cloud spreadsheet. Setting up Zing with Google Sheets is the easiest way to get started, as it requires no database connection. You can simply authenticate in with your Google credentials, or provide the URL to your Sheets.
This is also the best way to import CSVs (assuming they are within Sheets’ size limitations).
You can also connect to a Microsoft Excel file by importing it into Google Sheets, then connecting that sheet to Zing.
You can connect Zing to Google Sheets from either the Zing web console, the Zing web app, the iOS app, or Android.
Connection Modes
There are two ways to connect to Google Sheets:
- Live Connection mode, which will always run questions on the latest version of a sheet, and works with multiple tabs (you can choose which to make visible in Zing).
- Snapshot mode, which will run questions on the version of the sheet when you first connected it to Zing, and subsequent updates to the sheet will not be updated in Zing. This mode supports a single tab.
Setup Steps
For both modes, you’ll need:
-
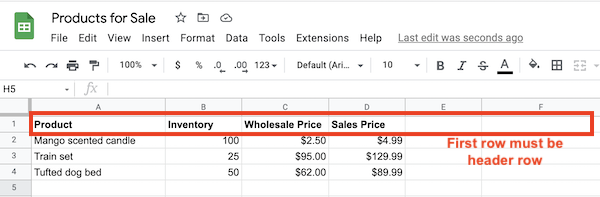
A correctly formatted Google Sheet with field names in the header row. Your sheet should contain only the data you wish to import. Only one table per sheet (for now). Field names should not include special characters.
-
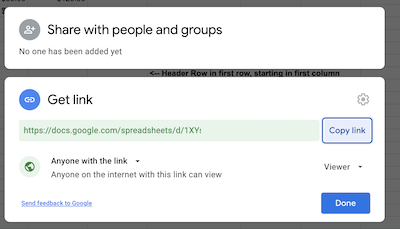
Permissions to that sheet - meaning that your Google Account has at least ‘view’ rights to the sheet, OR the sheet has ‘available to anybody with the link’ access
Web Console
Add a Google Sheet as a data source from the web:
-
Go to your Zing Data Web Console and ensure you are logged in
-
Tap the ‘data sources’ tab

-
Tap ‘Google Sheets’
-
To connect Zing to Google Sheets that are not public, authenticate into your Google account by clicking ‘Access your Google Sheets’ and enabling both Zing read access to your Sheets, and Google Drive read permissions when prompted. Both of these permissions must be granted for Zing to list your sheets and connect to your sheets as a data source.
From there you’ll see a list of your Google Sheets. Select one you’d like to import or search by name and click the name of the sheet, then click ‘Select’
-
To connect Zing to a publicly shared (available to anybody with the link) Google Sheet, you don’t need to authenticate into a Google account and can simply enter your Google Sheet URL.
-
Tap ‘Save’
-
Check for any warning messages which might indicate the sheet was incorrectly formatted.
-
Optionally choose if you want a live connection or a one-time snapshot. If you selected ’live connection’, choose which tabs you want to make visible to Zing.
-
The data source you just added will be available to everybody in your organization.
App
To add a Google Sheet as a data source from the Zing iOS or Android apps:
- Go to the sources tab
- Tap ‘Add a new data source’
- To connect Zing to Google Sheets that are not public, authenticate into your Google account by clicking ‘Access your Google Sheets’ and enabling Zing read access to your Sheets when prompted. From there you’ll see a list of your Google Sheets. Select one you’d like to import or search by name and click the name of the sheet, then click ‘Select’
- To connect Zing to a publicly shared (available to anybody with the link) Google Sheet, you don’t need to authenticate into a Google account and can simply enter your Google Sheet URL.
- Optionally choose if you want a live connection or a one-time snapshot. If you selected ’live connection’, choose which tabs you want to make visible to Zing.
- Tap ‘Confirm data source’. After a few seconds, Zing will show you if the sheet was successfully connected.
Notes
If you use the ‘Live Connection’ option to link Zing and the Google Sheet, be aware that modifying the sheet in a way that makes it improperly formatted (see above) will result in questions / graphs not loading correctly.

